1. Start here
This guide explains how to use the Luxury Lighting Beta interface for everyday work. It follows the published pages and form requirements inspected on October 13, 2026. Actual test outcomes are kept separately in the end-to-end test report.
Employees → Company → Contact / Lead → Bid → Estimate → Takeoff → Review → Pricing / RFQ → Review → Proposal → Sales follow-up and outcome
Start with an existing company and contact when they already exist. Create missing records before submitting the bid. An estimate is the pricing workflow for a bid; a revision is a new estimate version. SharePoint stores the working files. MMS remains the pricing and proposal tool.
| Your role | Where to start |
|---|---|
| Sales | My Leads, Relationships Hub, Submit New Bid, Sent Proposals and Bid Pipeline. |
| Takeoff estimator | Takeoff Needed. |
| Pricing estimator | Pricing Needed, Manufacturer Pricing & RFQ’s, RFQ Tracker and Proposal Needed. |
| Reviewer | Takeoff Review Needed and Pricing Review Needed. |
| Project manager | Project Management → Pricing Needed for PM-owned pricing; Lead Activity, company/bid details and tasks. |
| Administrator | Add New Employee and employee/user mappings. Maintain manufacturers, representatives and settings through authorized administrative access; there is no dedicated manufacturer creation page in the published page inventory. |
Pages and records available to you depend on your access and assignment. Personal queues use employee assignments and their linked Airtable user.
Updated October14: Quick Quote’s fresh five-stage test passed. PM Pricing Needed and Proposal Needed are published and tested through VE Proposal Ready to Send. Revision creation passed. Activity-date display accepted as is and scheduled follow-ups confirmed working by the owner. See the test report for evidence and explicit test limits.
2. Navigate, find a record and open its details
- Open Luxury Lighting Beta and choose the relevant interface from the left navigation.
- Select the page underneath that interface. Use Search to find a company, contact, bid or estimate by name.
- Use the available tabs, filters and date controls to narrow the list. Clear your search and temporary filters if a record is missing.
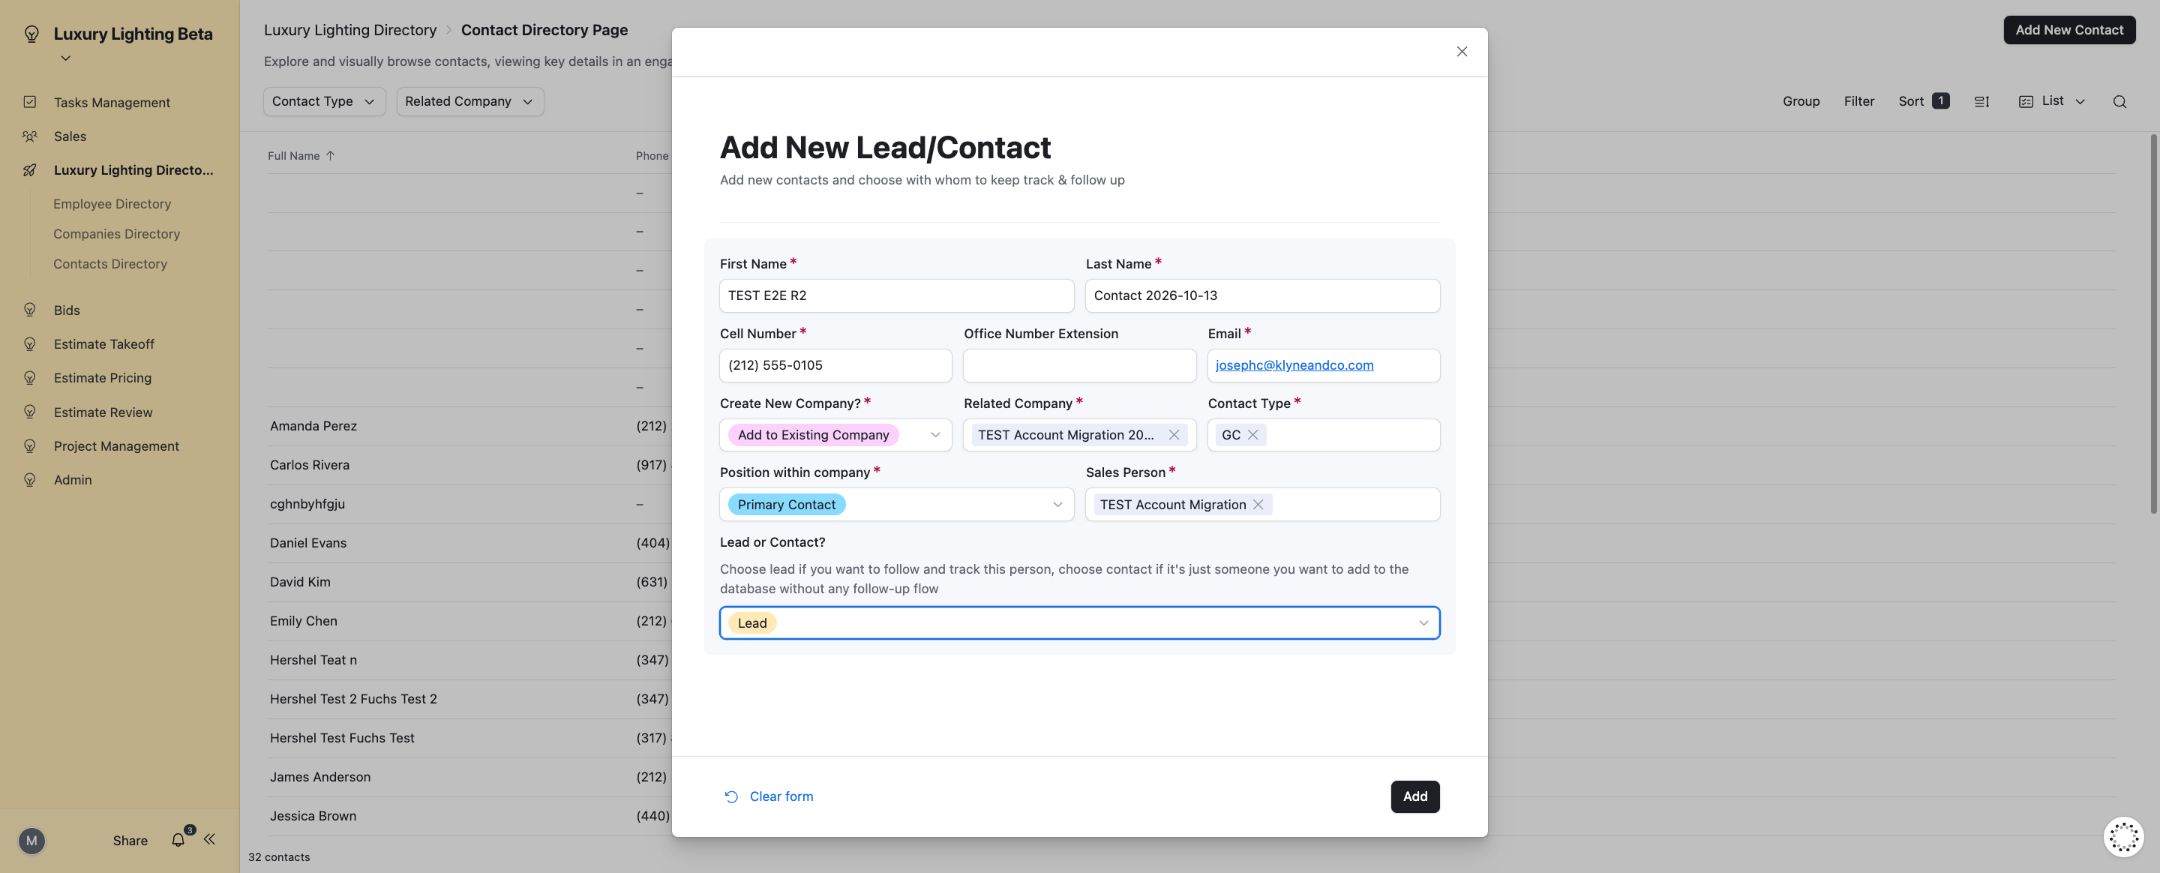
- Open the record name or Open detail view. Review the linked company, contact, bid, estimate and assigned team before taking an action.
- Use detail headings such as Estimate Info, Bid Info, Revision Info, Estimate Stages and Stages History to inspect the workflow. Close the panel or use the page’s Back button to return.
Disabled fields and linked-record buttons are read only in that layout. Do not assume a blank queue means no record exists: it can also mean another person is assigned or a different stage is active.
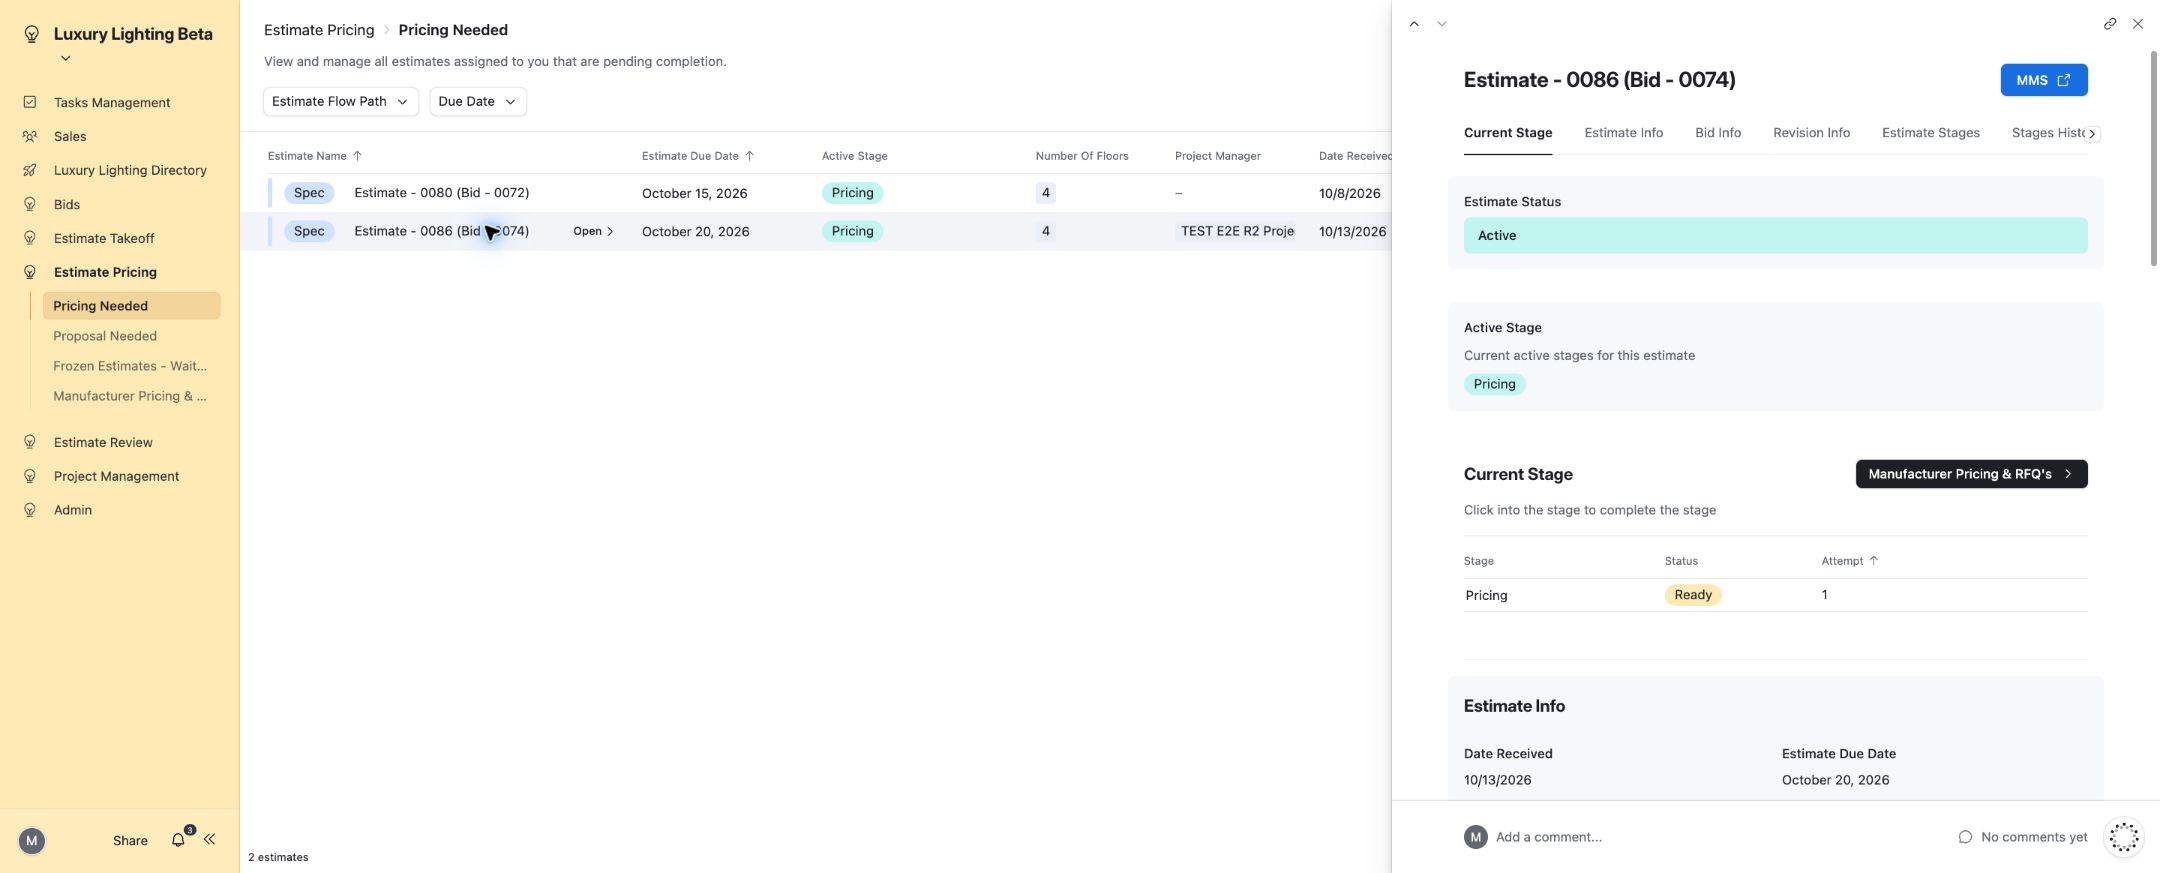
3. Set up an employee — administrator
Before you start: have the employee’s business contact details, position, team, manager and existing Airtable user available. Create the employee before assigning them as a company project manager.
- Open Admin → Add New Employee.
- Enter first and last names, cell phone, company email and start date. Add company phone, extension and personal email where appropriate.
- Select Reports to, Position, Team and Airtable User.
- Submit, wait for the confirmation, then find the person in Directory → Employee Directory.
- Open the detail and verify the name, position, team, status and user mapping.
Completion check: the employee exists in the directory with the correct Airtable user. Creating an employee record does not itself invite a new user or grant access. Have an administrator handle account access separately.
Use one consistent employee record per person/user. Duplicate user mappings can make assignment and follow-up ownership ambiguous.
Field checklist: Add New Employee
| Field | Requirement | What to enter |
|---|---|---|
| First Name | Required | Enter or select the correct value for this record. |
| Last Name | Required | Enter or select the correct value for this record. |
| Cell Phone | Required | Enter or select the correct value for this record. |
| Company Phone | Optional | Enter or select the correct value for this record. |
| Extension | Optional | Enter or select the correct value for this record. |
| Personal Email | Optional | Enter or select the correct value for this record. |
| Company Email | Required | Enter or select the correct value for this record. |
| Date Started | Required | Enter or select the correct value for this record. |
| Reports to | Required | Enter or select the correct value for this record. |
| Position | Required | Choices: Accountant, Admin, Bookkeeper, CEO, CFO, COO, Takeoff Estimator, Pricing Estimator, Project Manager, Purchaser, Reviewer, Sales Manager, Salesperson, Senior Accountant, Trainer. |
| Team | Required | Choices: Estimating, Executive, Finance, Leadership, Operations, Purchasing, Sales. |
| Airtable User | Required | Enter or select the correct value for this record. |
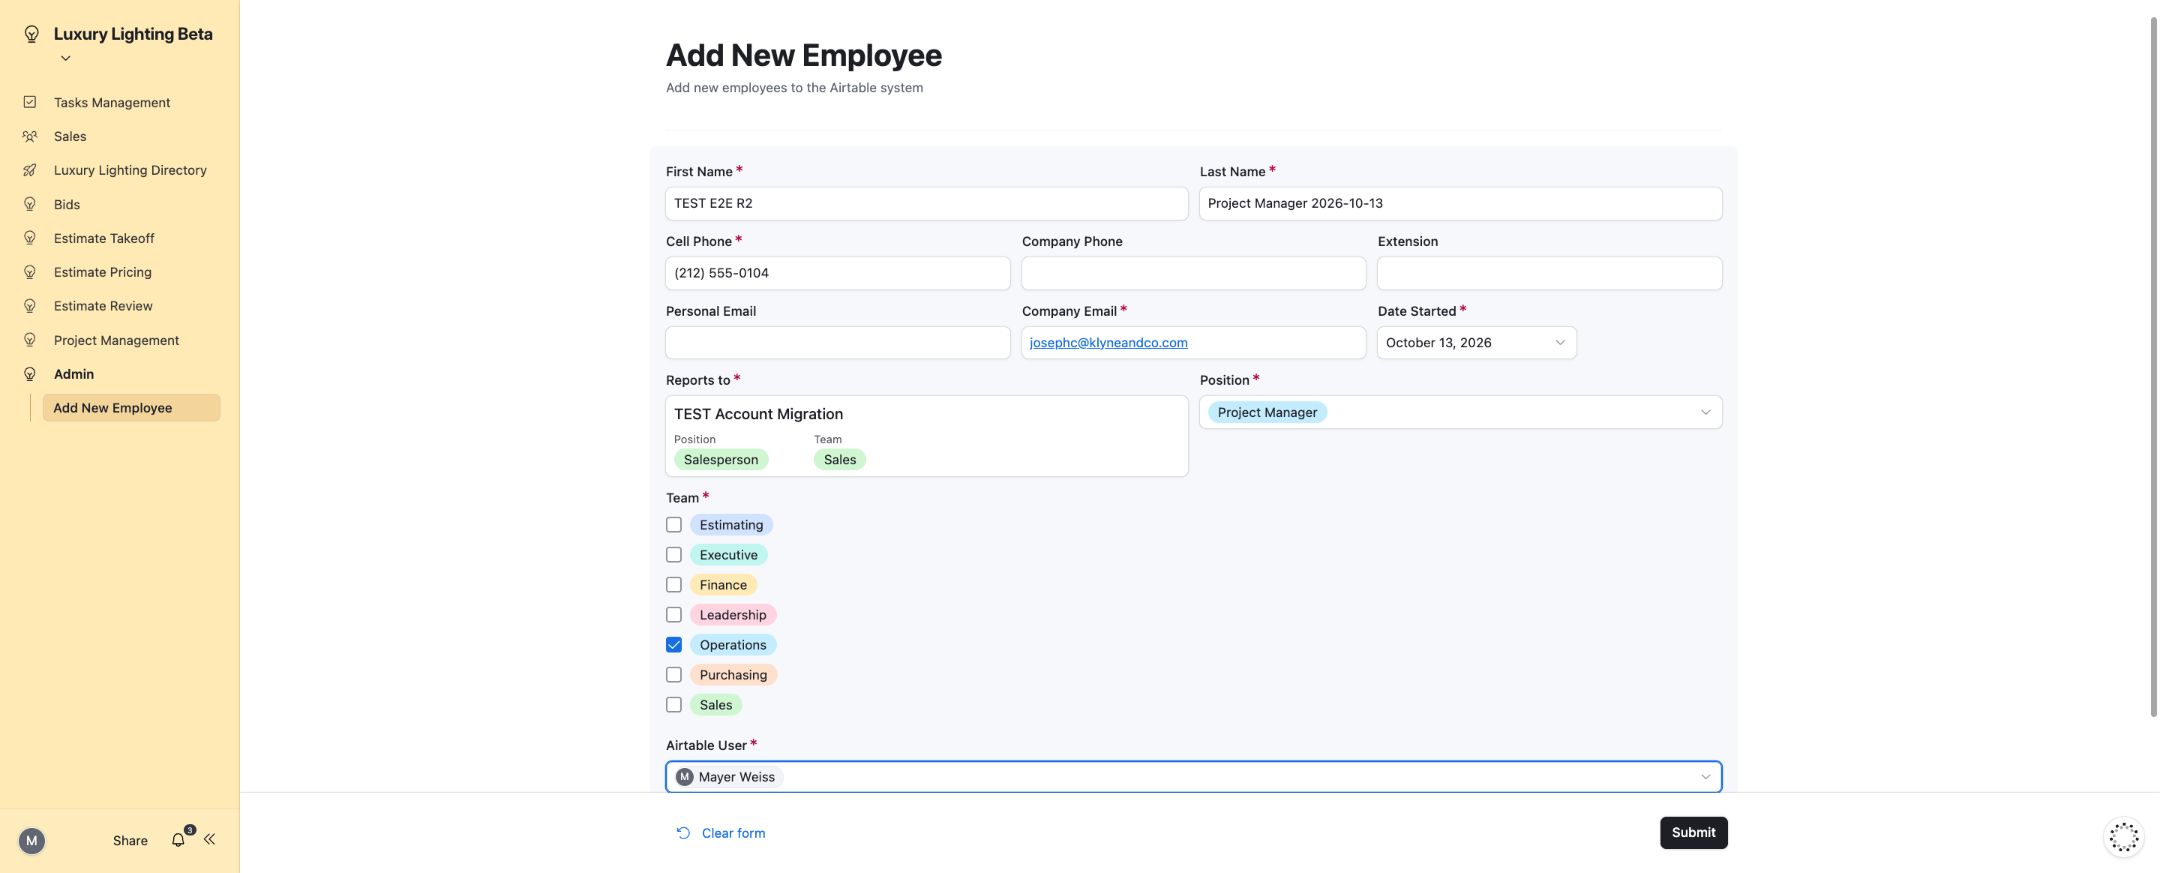
4. Create and maintain a company
Before you start: check the company directory for duplicates and confirm that its project manager exists.
- Open Luxury Lighting Directory → Companies Directory Page and select Add New Company.
- Enter the company name, company type, address and company phone number.
- Select the Company Project Manger field, using the label shown in the interface. Company Contacts and Website are optional.
- Submit and wait for confirmation. Search the directory for the company name.
- Open the company detail to review Company information, Contacts and Bids. Follow the linked records to see the people and opportunities associated with this company.
Completion check: the company is searchable and has the correct type, address and project manager. The system may create a PM assignment task when a company is created; check that task’s assignee and resolve it with your administrator if it conflicts with the PM already selected.
Field checklist: Add New Company
| Field | Requirement | What to enter |
|---|---|---|
| Company Name | Required | Enter or select the correct value for this record. |
| Company Type | Required | Enter or select the correct value for this record. |
| Company Contacts | Optional | Enter or select the correct value for this record. |
| Company Project Manger | Required | Enter or select the correct value for this record. |
| Address | Required | Enter or select the correct value for this record. |
| Company Phone Number | Required | Enter or select the correct value for this record. |
| Website | Optional | Enter or select the correct value for this record. |
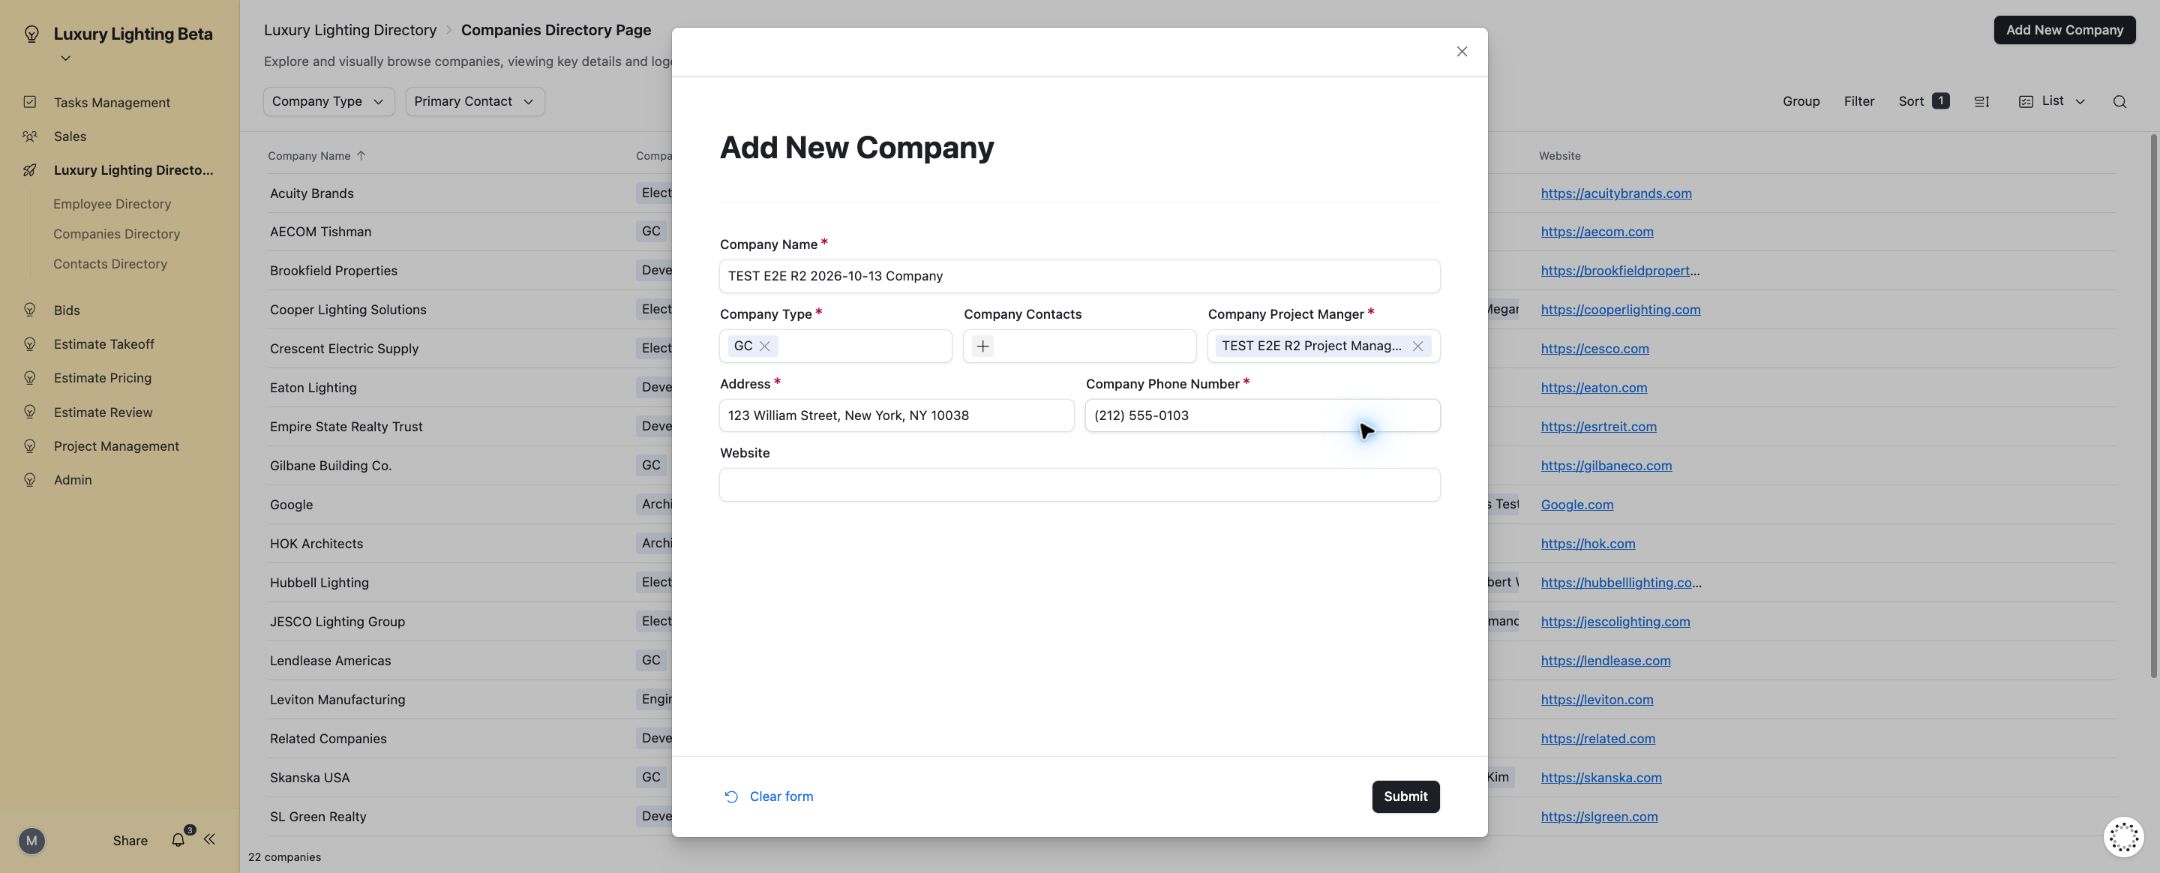
5. Create a contact or a lead
- Open Directory → Contact Directory Page and select Add New Contact. The form is named Add New Lead/Contact.
- Enter first name, last name, cell number and email. Add the office extension if needed.
- Choose Add to Existing Company and select Related Company, or choose Create New Company and complete the company fields that appear.
- Select Contact Type, Position within company and Sales Person.
- Choose Lead if you want ongoing tracking and follow-up, or Contact for a directory-only record.
- Select Add. Search for the new person and open the detail to verify the company, contact information and owner.
New-company branch: enter Company Name, Company Phone Number, Address and company Email; Website is optional. The system has a company creation automation for this branch. Verify that the company and contact were linked successfully, then ensure the company has a PM before using it for a bid.
Completion check: the contact is in the directory; a lead should also be available in the relevant sales lead view for its owner. The existing-company picker only offers companies whose contacts include a salesperson linked to your current Airtable user. A company created separately with no contacts does not meet this rule. For a new sales company, use this form’s Create New Company branch to establish the company/contact relationship together, or have an authorized administrator assign the appropriate contact and salesperson. Do not link to an unrelated company merely to submit.
Field checklist: Add New Lead/Contact
| Field | Requirement | What to enter |
|---|---|---|
| First Name | Required | Enter or select the correct value for this record. |
| Last Name | Required | Enter or select the correct value for this record. |
| Cell Number | Required | Enter or select the correct value for this record. |
| Office Number Extension | Optional | Enter or select the correct value for this record. |
| Required | Enter or select the correct value for this record. | |
| Create New Company? | Required | Choices: Add to Existing Company, Create New Company. |
| Related Company | Required; shown only in the relevant branch | Enter or select the correct value for this record. |
| Contact Type | Required | Enter or select the correct value for this record. |
| Position within company | Required | Choices: Primary Contact, Project Manager, Manager, Director, Accountant, Sales Rep. |
| Sales Person | Required | Enter or select the correct value for this record. |
| Lead or Contact? | Optional | Choose lead if you want to follow and track this person, choose contact if it's just someone you want to add to the database without any follow-up flow Choices: Lead, Contact. |
| Company Name | Required; shown only in the relevant branch | Enter or select the correct value for this record. |
| Company Phone Number | Required; shown only in the relevant branch | Enter or select the correct value for this record. |
| Address | Required; shown only in the relevant branch | Enter or select the correct value for this record. |
| Required; shown only in the relevant branch | Enter or select the correct value for this record. | |
| Website | Optional; shown only in the relevant branch | Enter or select the correct value for this record. |
6. Manage leads and relationships
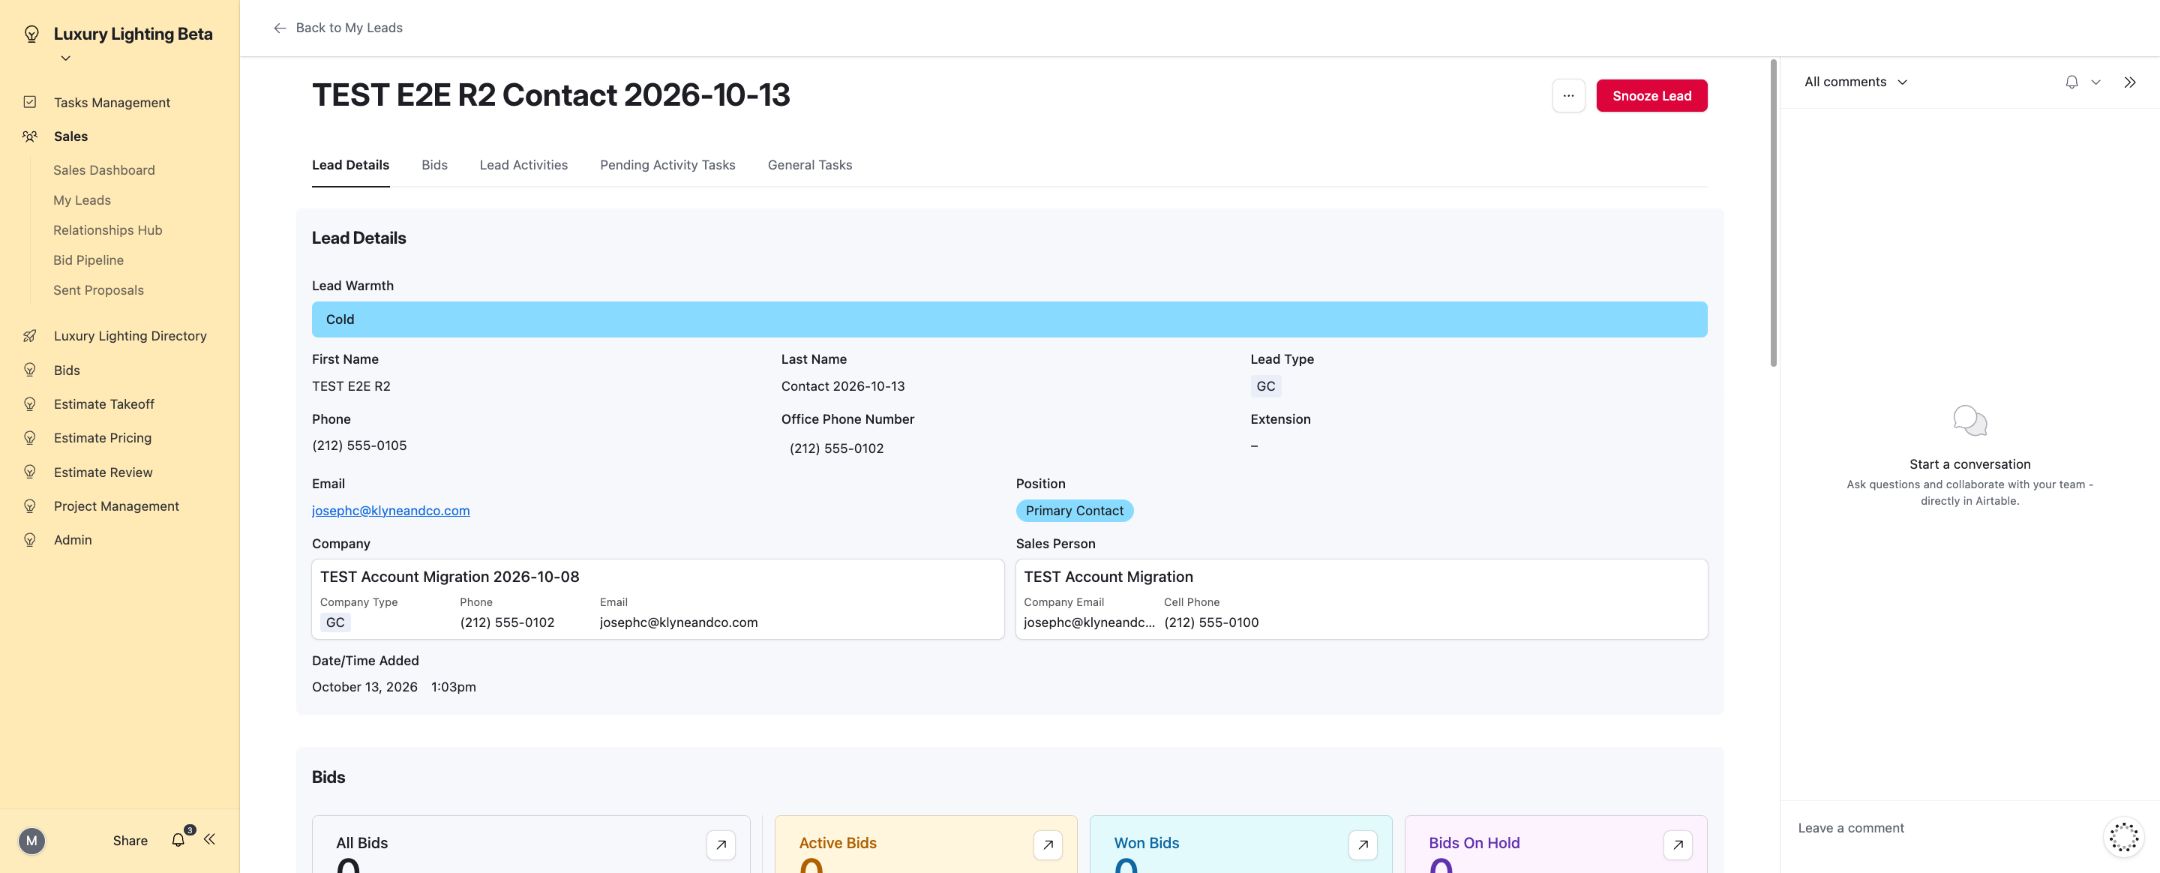
Open Sales → My Leads to review your leads. Open a lead to inspect Lead Details, linked Bids, Lead Activities, pending activity tasks and general tasks.
- Check the lead’s company, assigned salesperson, warmth and previous activity before contacting them.
- Use Log Activity after an interaction has occurred.
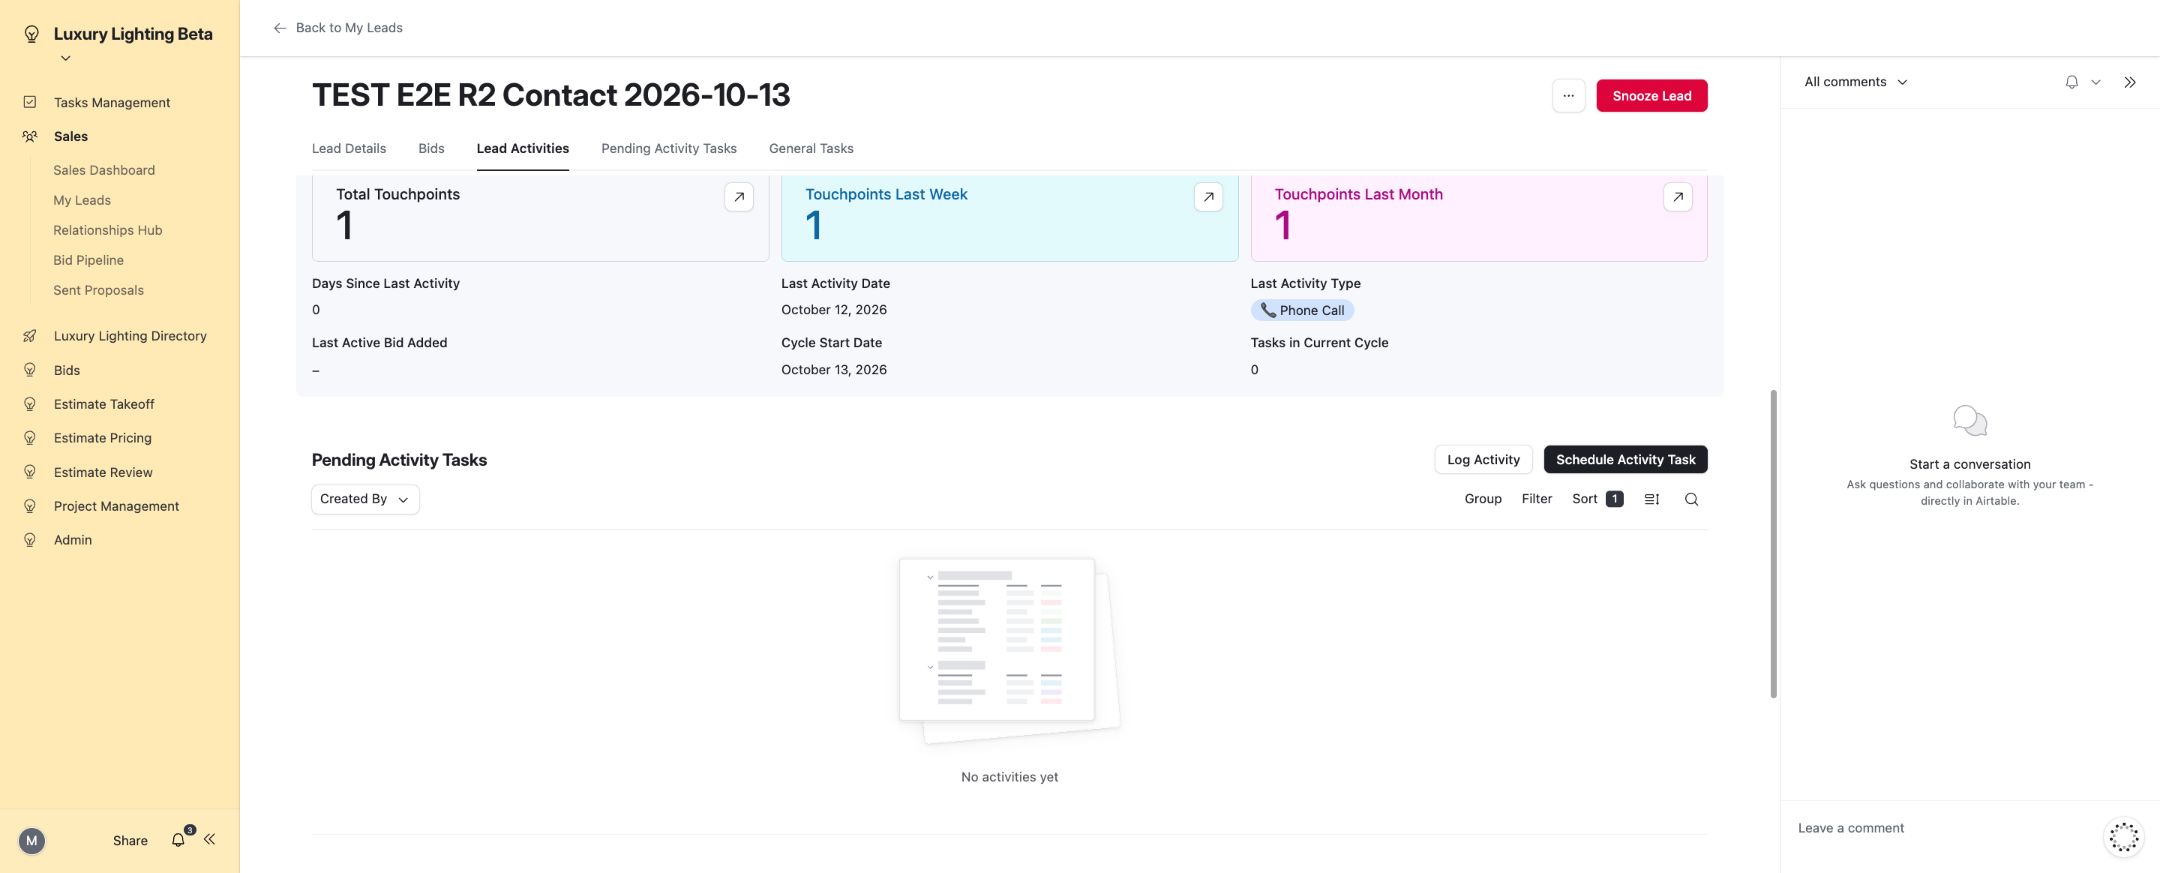
- Use Schedule Activity Task for a future call, email, meeting, visit or other touchpoint.
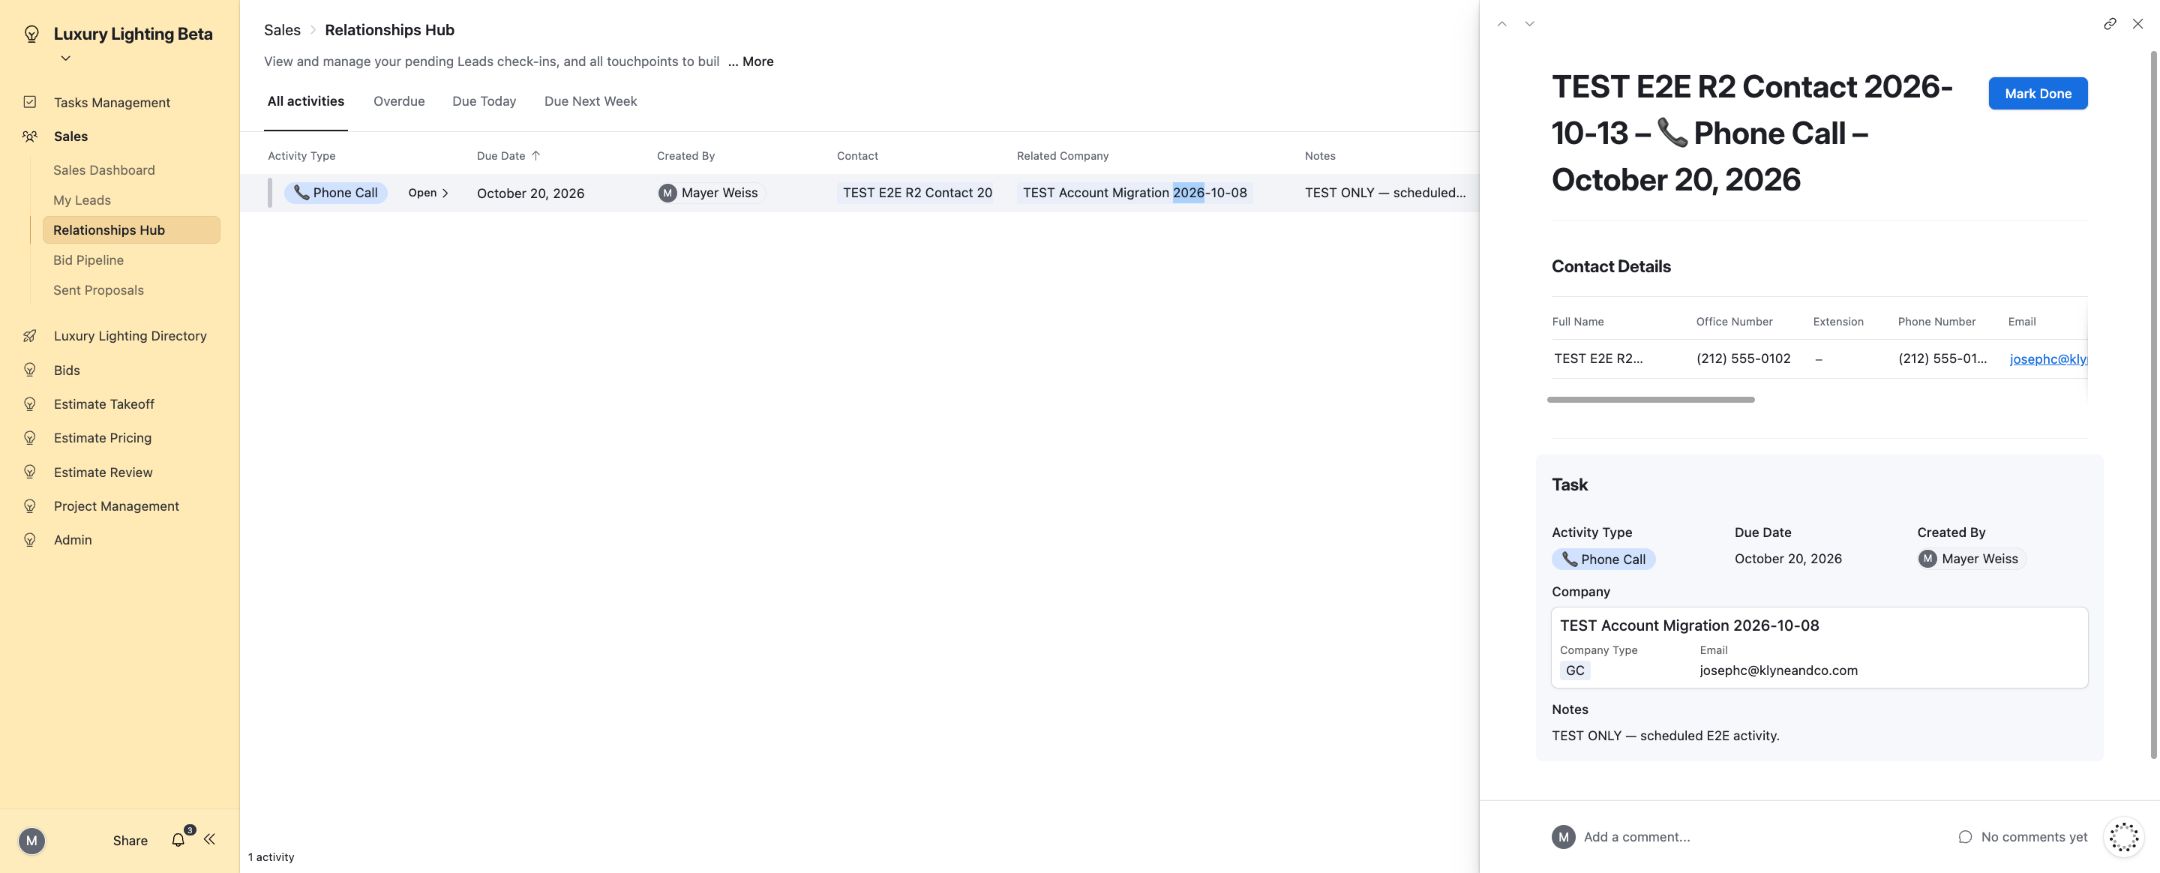
- Use Relationships Hub to work through All activities, Overdue, Due Today and Due Next Week.
- If you use Snooze Lead, verify that the lead visibly changes to a snoozed state. The system includes an Unsnooze action and warmth restoration automation; report the issue if clicking Snooze produces no visible result.
Warmth and follow-up timing are driven by activity and configured settings. Review the recorded dates rather than relying solely on a warmth label.
7. Log an interaction that already happened
- From the lead or Relationships Hub, select Log Activity.
- Select Activity Type and enter the actual Date Done.
- Select Contact and Salesperson. Write Notes/Outcome that explain what happened.
- Leave Affect Cycle checked if this interaction should count toward the automatic activity sequence. Uncheck it for an administrative note or activity that should not advance that cycle.
- If a follow-up is needed, select Next Step and fill Follow-up Date when shown. Attach supporting material if useful.
- Select Log, then verify the success message and the activity in the lead’s history.
Automatic behavior: the form records this as a completed Activity Log. A follow-up automation can create a task when Next Step, Follow-up Date, Contact and Salesperson are populated. Verify that the task exists before assuming the follow-up is scheduled.
Completion check: activity type, date, person and outcome are correct. During testing, a date appeared one day earlier in a lead summary; verify the displayed date and report discrepancies.
Field checklist: Log Activity
| Field | Requirement | What to enter |
|---|---|---|
| Activity Type | Required | Choices: 🎁 Gift / Drop-off, 💬 Check-in (quick touchpoint), 📞 Phone Call, 📧 Email, 🤝 Meeting, 🧑🤝🧑 Site Visit, 🎯 Rep's Choice. |
| Date Done | Required | Enter or select the correct value for this record. |
| Contact | Required | Enter or select the correct value for this record. |
| Salesperson | Required | Enter or select the correct value for this record. |
| Notes/Outcome | Optional | Enter or select the correct value for this record. |
| Affect Cycle | Optional | Uncheck if this activity shouldn't affect the automatic tasks sequence |
| Next Step | Optional | Choices: 🎁 Gift / Drop-off, 💬 Check-in (quick touchpoint), 📞 Phone Call, 📧 Email, 🤝 Meeting, 🧑🤝🧑 Site Visit, 🎯 Rep's Choice. |
| Follow-up Date | Optional; shown only in the relevant branch | Enter or select the correct value for this record. |
| Attachments | Optional | Enter or select the correct value for this record. |
| Status | Set automatically; read only | Choices: Pending, Done. |
| Log | Set automatically; read only | Choices: Task, Activity Log. |
8. Schedule and complete a future activity
- Select Schedule Activity Task.
- Select Activity Type, Due Date, Contact and Salesperson. Add notes explaining the purpose.
- Select Schedule and confirm the pending task appears on the lead or in Relationships Hub.
- When the activity has happened, open it and select Mark Done.
- Complete the outcome form with the actual completion date, notes and relevant follow-up details, then submit.
- Confirm the success message and check that the activity has left the pending queue.
Completion check: the activity is recorded as completed, with an accurate outcome, and any next action has its own owner and due date.
Field checklist: Schedule Activity Task
| Field | Requirement | What to enter |
|---|---|---|
| Activity Type | Required | Choices: 🎁 Gift / Drop-off, 💬 Check-in (quick touchpoint), 📞 Phone Call, 📧 Email, 🤝 Meeting, 🧑🤝🧑 Site Visit, 🎯 Rep's Choice. |
| Due Date | Required | Enter or select the correct value for this record. |
| Contact | Required | Enter or select the correct value for this record. |
| Salesperson | Required | Enter or select the correct value for this record. |
| Notes | Optional | Enter or select the correct value for this record. |
| Task? | Set automatically; read only | Choices: Task, Activity Log. |
9. Create and manage general tasks
General tasks are separate from lead activity tasks. Use them for administrative work, assignment, document preparation and other work that is not a customer touchpoint.
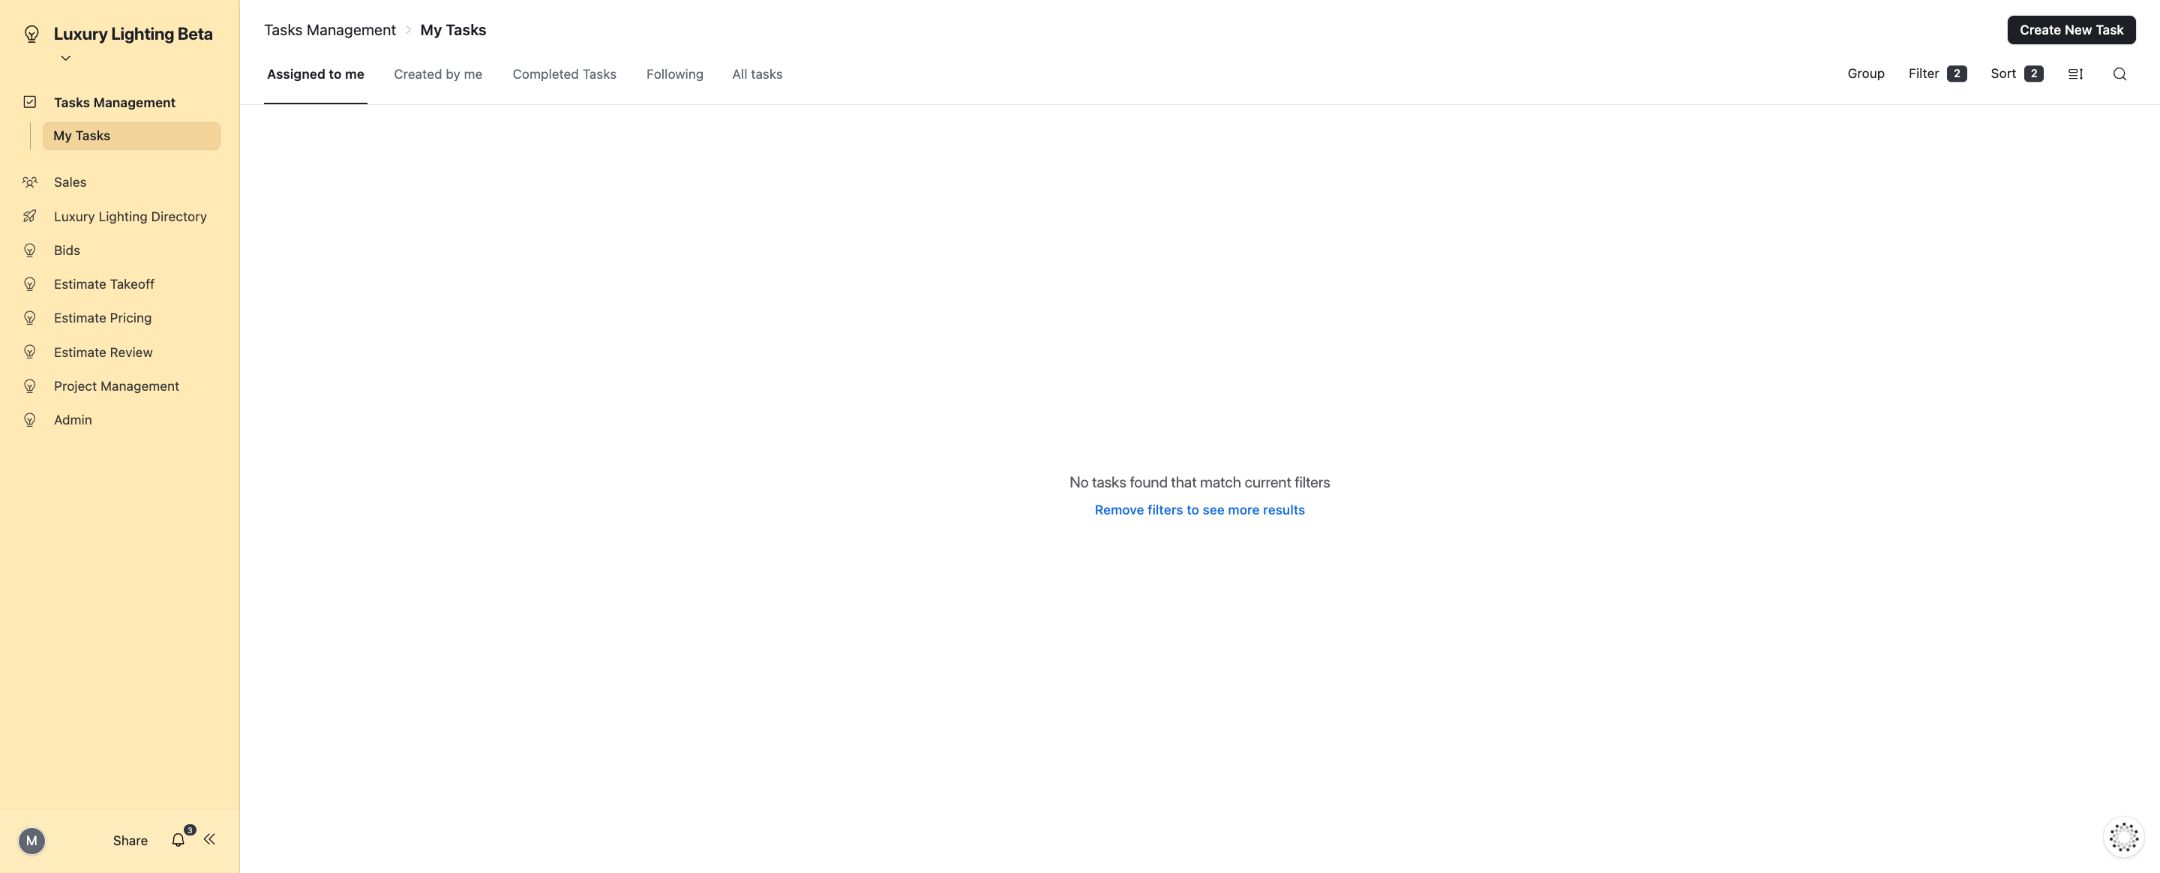
- Open Tasks Management → My Tasks and select Create New Task, or use All Tasks → Add task.
- Select Assigned By and Assign To. Add Followers if others need visibility.
- Enter Due Date, Priority, Task Name and Description. Optionally add Start Date, Predecessor, Contact and Attachments.
- Submit and verify the task in the appropriate queue.
- Use Assigned to me, Created by me, Following, Completed Tasks and All tasks to review work. All Tasks provides Open Tasks, Completed Tasks and All tasks tabs.
- Open a task to review its details and update its status where your permissions expose an editable control. Confirm it appears in the appropriate completed/open view afterward.
Assigned By is intentionally restricted to employees whose Company Email contains the signed-in user’s email. Your linked Airtable User alone does not satisfy this email-based rule. If it is empty, have an administrator verify your existing employee’s business email and account identity. Do not remove the filter or create a duplicate employee as a workaround. Assign To may have its own selection rules; verify those separately.
Field checklist: Create New Task
| Field | Requirement | What to enter |
|---|---|---|
| Assigned By | Required | Enter or select the correct value for this record. |
| Assign To | Required | Enter or select the correct value for this record. |
| Followers | Optional | Enter or select the correct value for this record. |
| Start Date | Optional | Enter or select the correct value for this record. |
| Due Date | Required | Enter or select the correct value for this record. |
| Predecessor | Optional | Enter or select the correct value for this record. |
| Priority | Required | Choices: 🔴High, 🟡Medium, 🟢Low. |
| Task Name | Required | Enter or select the correct value for this record. |
| Description | Required | Enter or select the correct value for this record. |
| Contact | Optional | Enter or select the correct value for this record. |
| Attachments | Optional | Enter or select the correct value for this record. |
10. Submit a new bid
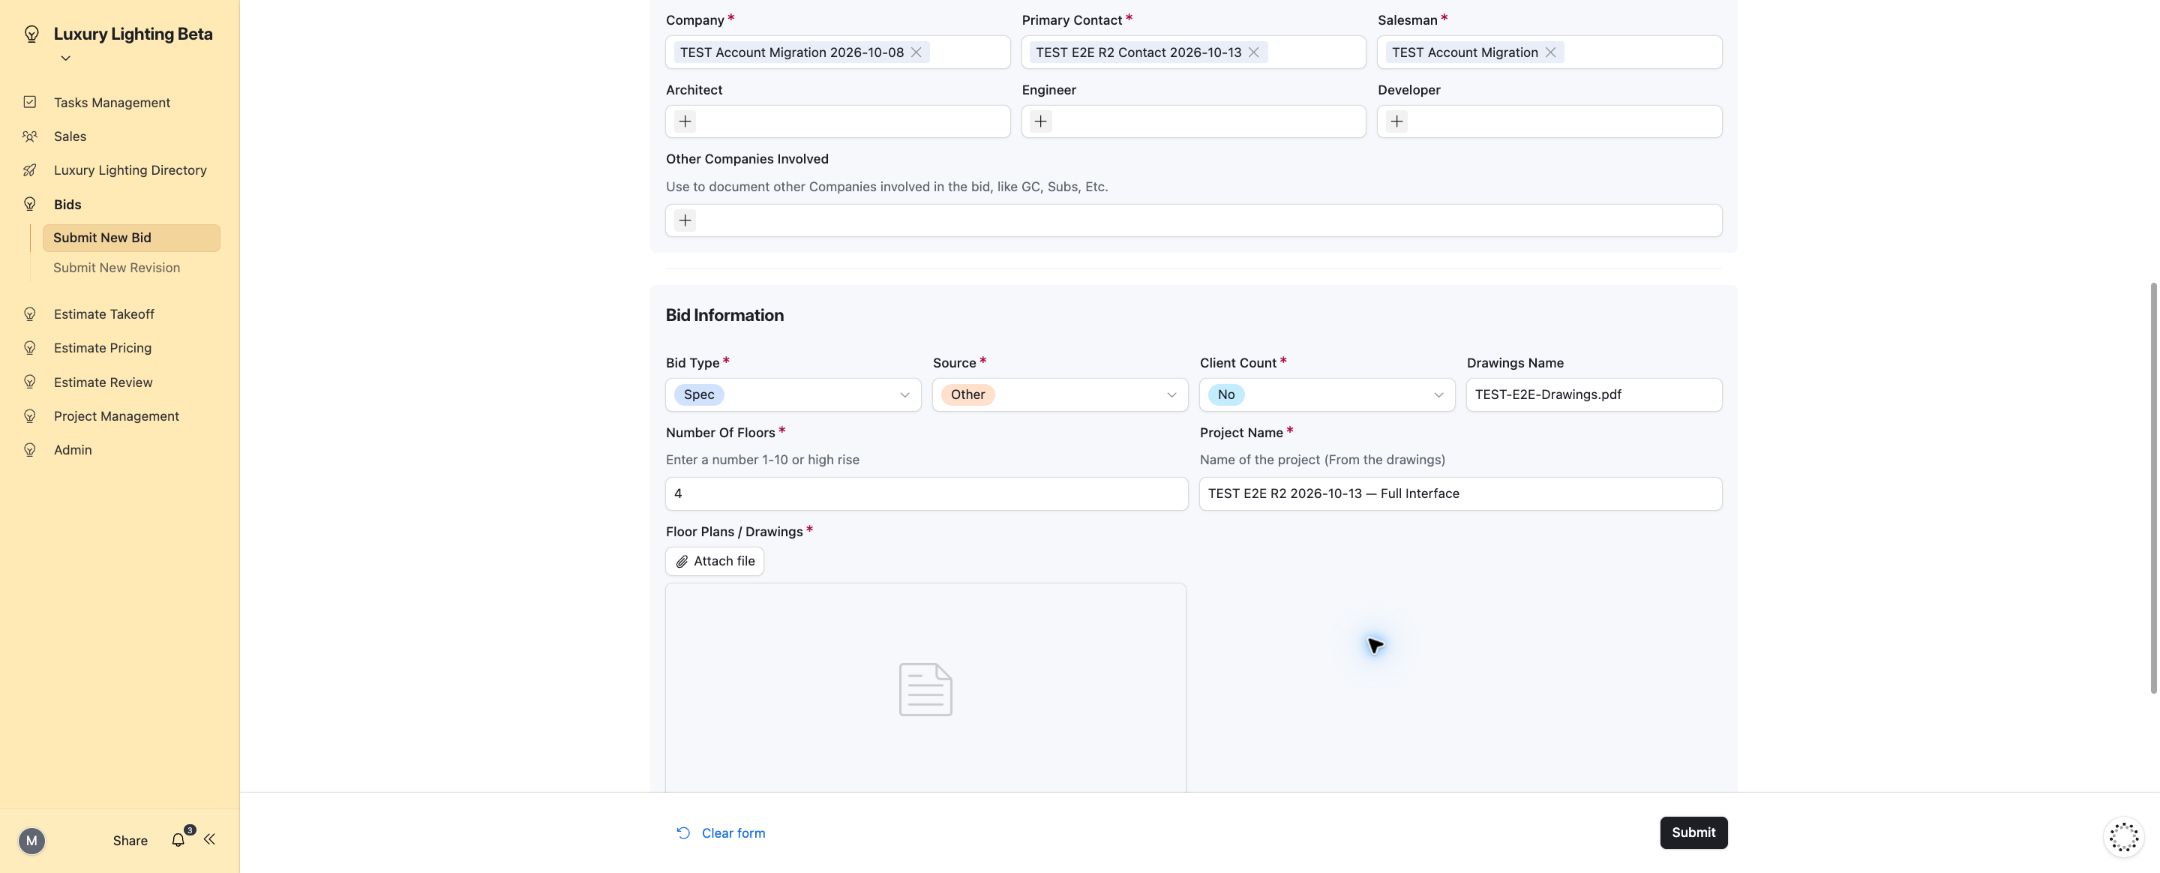
Before you start: prepare the client company, primary contact, salesperson, complete project address, project name, territory, bid source, estimating instructions, received/due dates and drawing files. Architect, engineer, developer and other involved companies can be linked when known.
- Open Bids → Submit New Bid.
- Enter Full Street Address, City, State, Zip Code and Territory.
- Select Company, Primary Contact and Salesman. Confirm that these belong to the intended opportunity.
- Select Bid Type (Spec, VE or Quick Quote), Source and Client Count.
- Enter Number Of Floors as instructed by the form: 1–10 or high rise. Enter Project Name from the drawings.
- Upload Floor Plans / Drawings. Wait until the attachment is visibly present. Add Drawings Name when useful.
- Set Date Received and Estimate Due Date, review all values and select Submit.
- Find the bid in Sales → Bid Pipeline. Open it, verify the normalized address and assigned team, then open its linked estimate.
Automatic behavior: Airtable resolves/links the address, assigns the estimating team and reviewer, takes the company PM for the bid and creates the estimate when its readiness conditions are met. An address already in the system can route the estimate to Waiting for Proposal – Frozen. Initial address loading can delay this process; avoid submitting another bid while the first is processing.
Completion check: one bid exists with the correct customer and address, a linked estimate and the expected assignments. If the address/error state persists, escalate rather than treating submission alone as completion.
Bids Google Maps Test: this page is not published and is outside the user workflow. Use Submit New Bid for intake.
Field checklist: Submit New Bid
| Field | Requirement | What to enter |
|---|---|---|
| Full Street Address | Required | Enter or select the correct value for this record. |
| City | Required | Enter or select the correct value for this record. |
| State | Required | Enter or select the correct value for this record. |
| Zip Code | Required | Enter or select the correct value for this record. |
| Territory | Required | Choices: NYC, Upstate NY, Northern NJ, Southern NJ, Other. |
| Company | Required | Enter or select the correct value for this record. |
| Primary Contact | Required | Enter or select the correct value for this record. |
| Salesman | Required | Enter or select the correct value for this record. |
| Architect | Optional | Enter or select the correct value for this record. |
| Engineer | Optional | Enter or select the correct value for this record. |
| Developer | Optional | Enter or select the correct value for this record. |
| Other Companies Involved | Optional | Enter or select the correct value for this record. |
| Bid Type | Required | Choices: Spec, VE, Quick Quote. |
| Source | Required | Choices: Email (Quote Box), Building Connected Portal, Other Portal, Phone, Other. |
| Client Count | Required | Choices: Yes, No. |
| Drawings Name | Optional | Enter or select the correct value for this record. |
| Number Of Floors | Required | Enter a number 1-10 or high rise |
| Project Name | Required | Name of the project (From the drawings) |
| Floor Plans / Drawings | Required | Enter or select the correct value for this record. |
| Date Received | Required | Enter or select the correct value for this record. |
| Estimate Due Date | Required | Enter or select the correct value for this record. |
Choose the correct estimating route
| Selection | Configured work and current limitation |
|---|---|
| Spec + Client Count No | Takeoff → Takeoff Review and Pricing become ready in parallel → Pricing Review → Proposal Creation. Normal five-stage path and delivery verified. |
| Client Count Yes | Flow Path becomes Count, overriding the selected estimate type. It starts with Pricing → Pricing Review → Proposal Creation. There are no Takeoff stages; this is the client-supplied-count route. All three stages verified. |
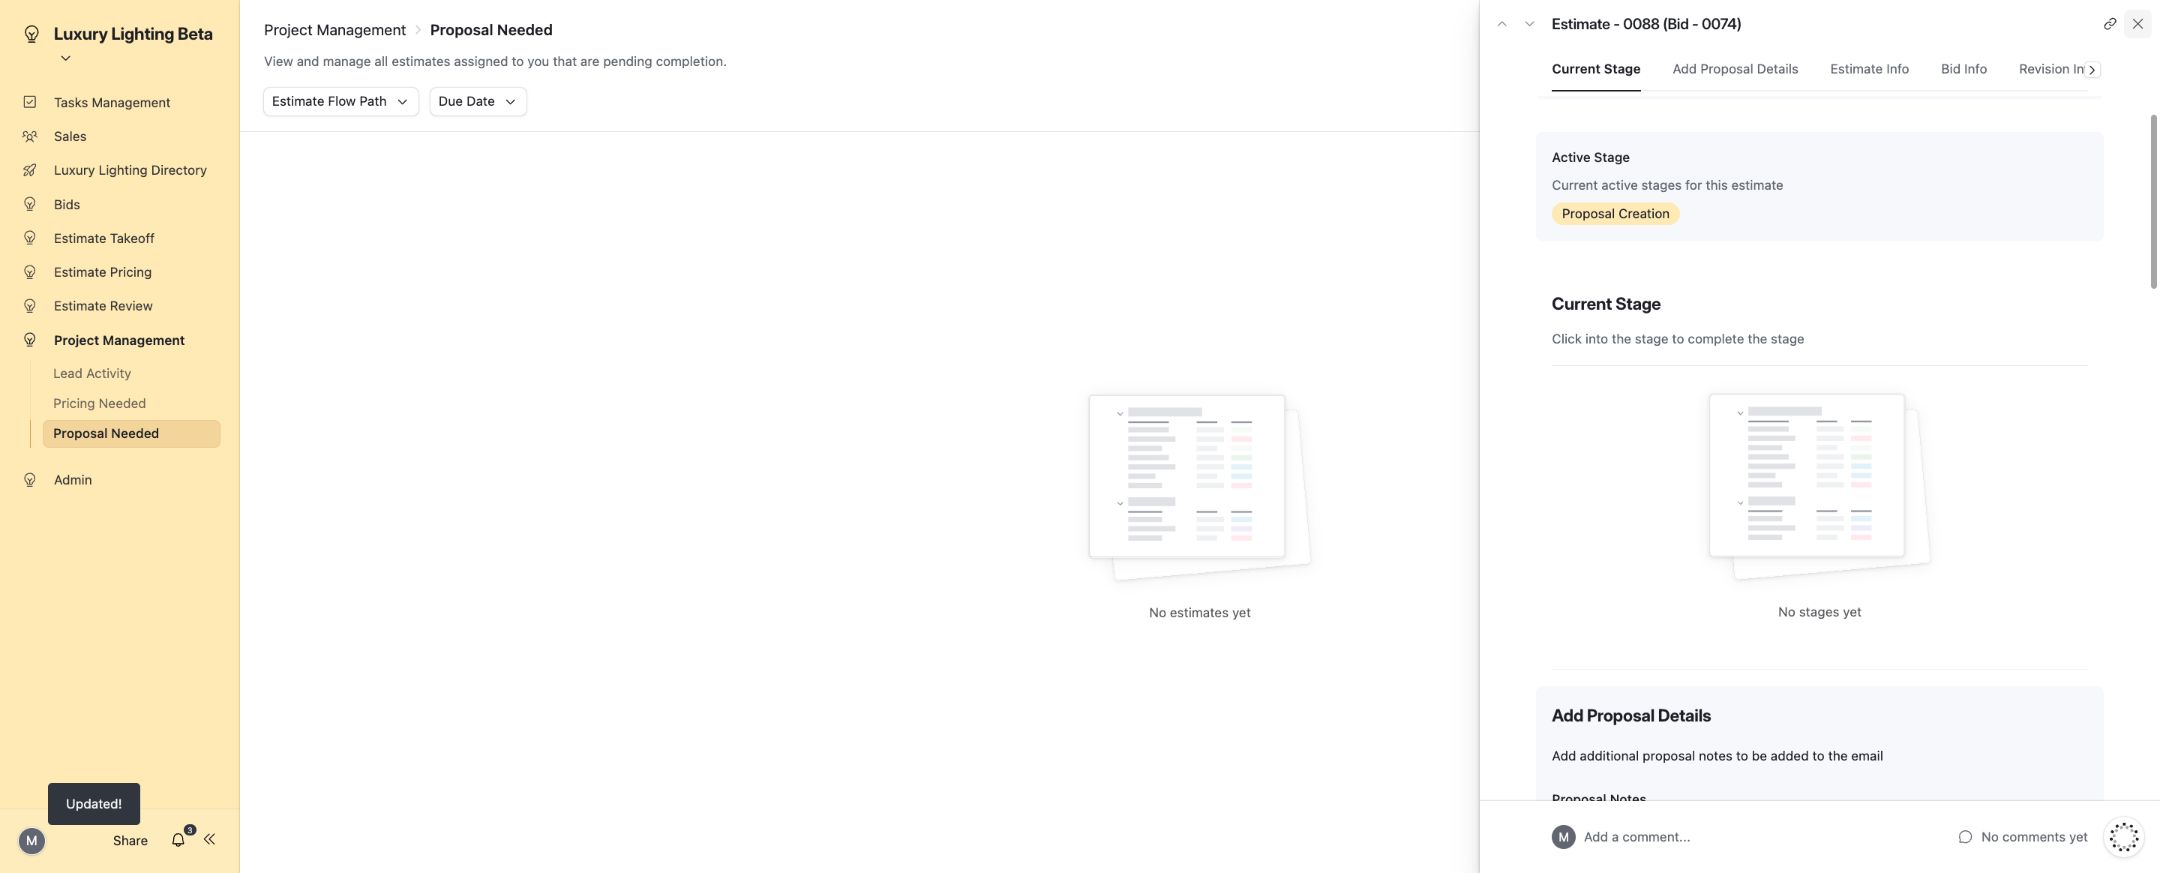
| VE + Client Count No | Takeoff, Takeoff Review, PM-owned Pricing and PM-owned Proposal Creation; no Pricing Review template. Use Project Management → Pricing Needed, then Proposal Needed. Both PM stages passed on0088, reaching Proposal Ready to Send. |
| Quick Quote + Client Count No | Same five stage names as Spec, including both reviews. Fresh0094 automatically created all five stages and passed the published controls through Proposal Ready to Send. Allow initialization to finish, then refresh if the first stage initially looks blank. |
| Frozen estimate | Use Frozen Estimates – Waiting on Proposal and supply/send the final proposal. No normal stage records are required. Frozen delivery verified with a readable test PDF. |
11. Understand the estimate folders and file handoff
- Open the estimate and inspect Estimate Info.
- Use Blueprints Folder for drawings, Takeoff Folder for takeoff files and Estimate Folder for pricing/proposal files.
- If the links are blank immediately after intake, wait for the next scheduled folder run and refresh the record. The current schedule is every 15 minutes.
- Open the folder link, confirm the folder belongs to the correct estimate and verify the files it contains.
- Upload the completed takeoff and pricing/proposal files to their corresponding folders.
Automatic behavior: Make creates the main estimate folder and Blueprints, Takeoff and Estimates subfolders, writes their URLs back to Airtable and moves uploaded drawings into Blueprints. Successfully transferred drawings can disappear from the estimate’s Airtable attachment field after transfer; verify the SharePoint copy.
Make does not generate a takeoff, price the project or create an MMS proposal. Empty Takeoff and Estimates folders require the responsible user to upload the work product.
Completion check: links open the correct estimate folders and the expected files are present and readable.
12. Complete takeoff
- Open Estimate Takeoff → Takeoff Needed.
- Open the assigned estimate. Check due date, floor count, customer/project information, drawings and assigned team.
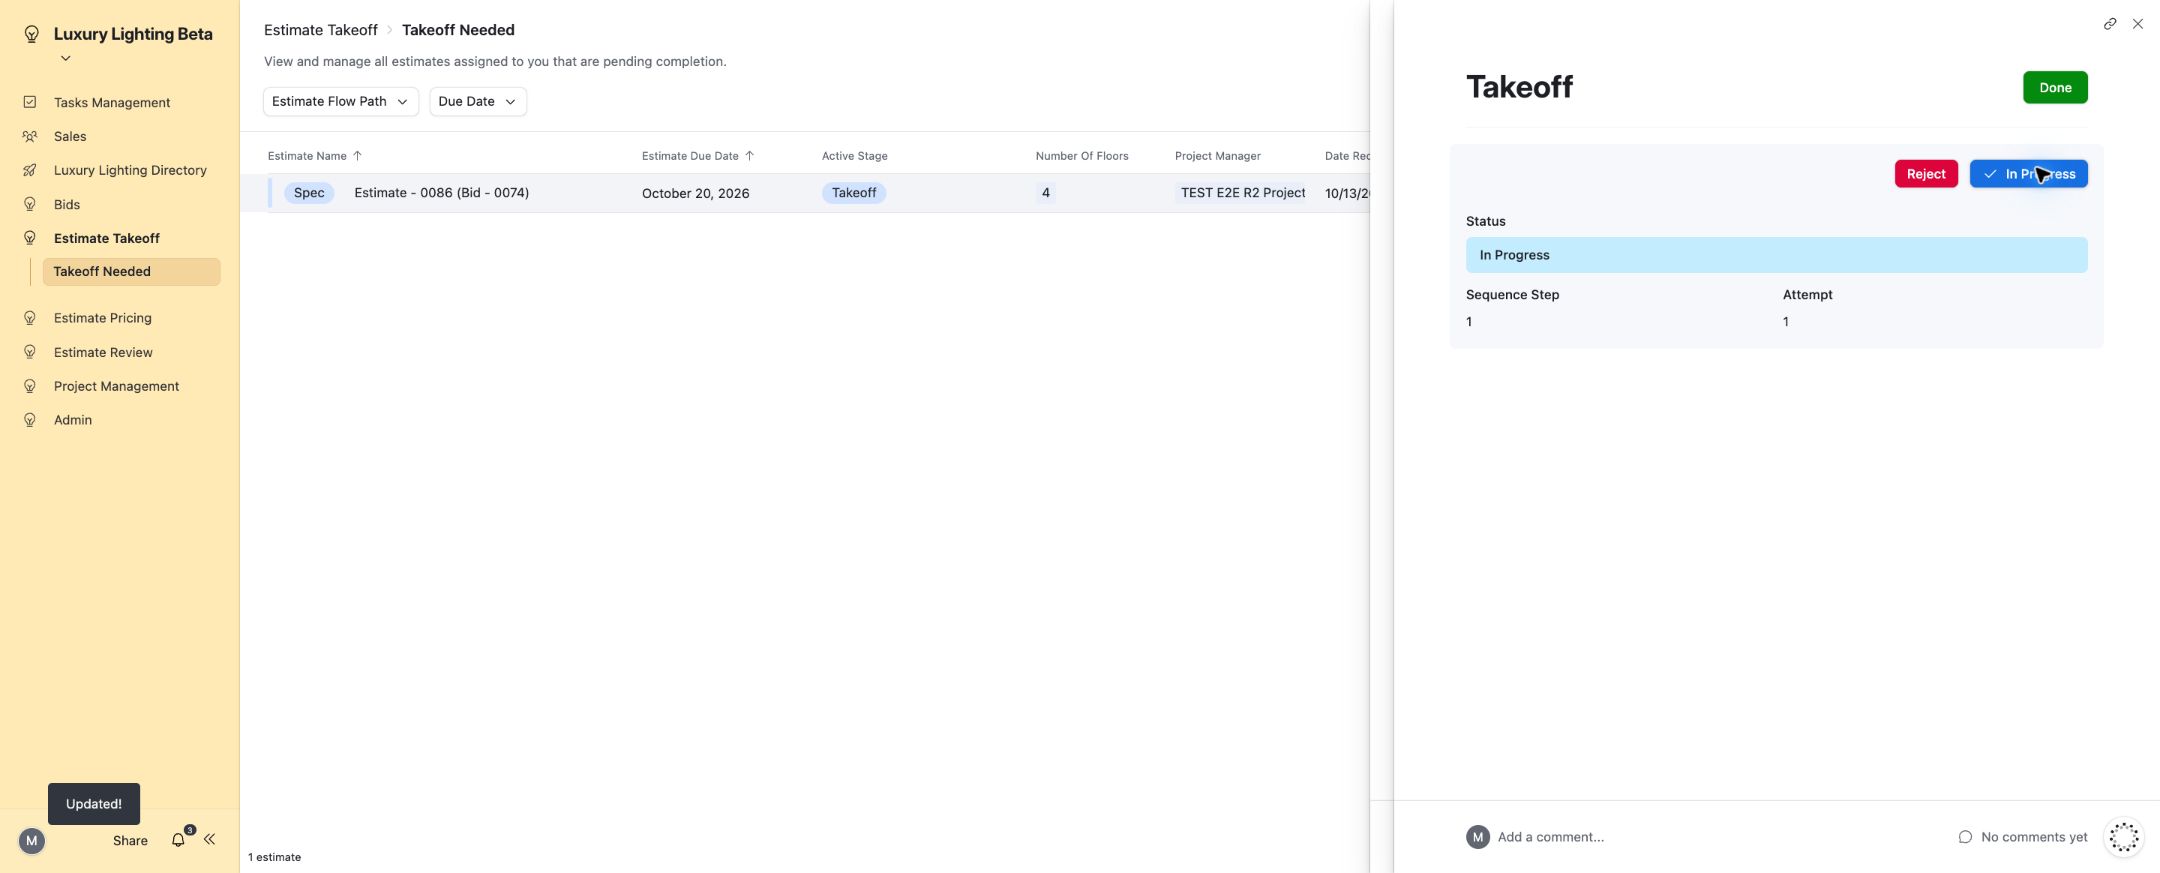
- Open the active Takeoff stage record and select In Progress when work begins.
- Prepare the takeoff using the Blueprints files and save the completed file in the Takeoff folder.
- Verify the uploaded file, then mark the stage Done.
- Confirm the stage shows Done and the record leaves your takeoff queue. Check Estimate Stages and Stages History for the handoff.
Stage availability is controlled by configured dependencies. Some work can become available in parallel; follow the active queue and dependency state rather than assuming every stage starts strictly one at a time.
13. Review takeoff or pricing
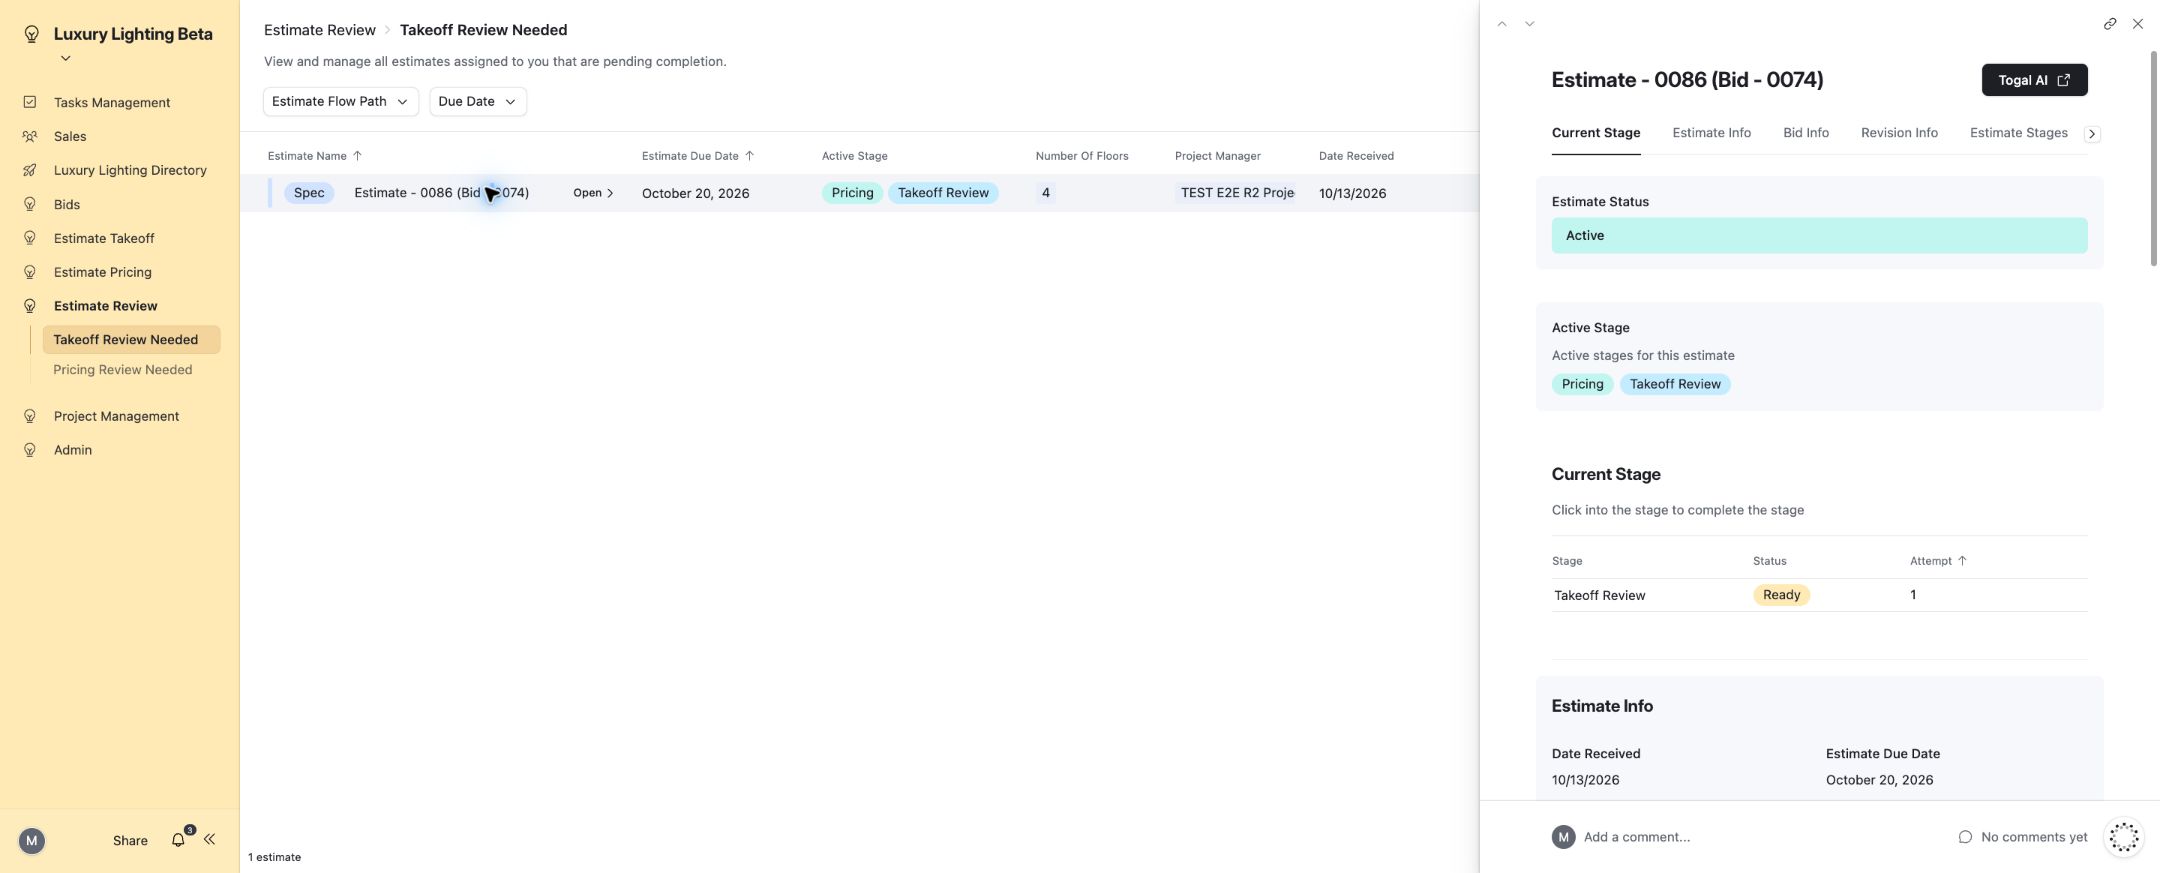
- Open Estimate Review → Takeoff Review Needed or Pricing Review Needed.
- Open the estimate and its active review stage. Inspect the supporting drawings, takeoff or pricing files and previous stage history.
- Use In Progress while reviewing, if needed.
- For approved work, select Done and verify the saved status and subsequent stage availability.
- For corrections, click Reject to open the reason form, save specific Rejection Notes, then click the top Reject button again. In the confirmation dialog choose Yes, continue.
- Verify the status is actually Rejected and inspect the new attempt/rework stages before handing it back.
Expected automation: persisted rejection is configured to bypass affected stage records and recreate the necessary work with a new attempt. Stage history preserves the actions.
14. Price the estimate and add manufacturers
- Pricing estimators: open Estimate Pricing → Pricing Needed. Project managers: open Project Management → Pricing Needed. Select the estimate assigned to you.
- Review the project, approved takeoff, due date, estimate version and Estimate Folder.
- Select Manufacturer Pricing & RFQ’s.
- Check the selected estimate heading. If it differs from the estimate you opened, select the correct estimate in the left record list before adding manufacturers or processing requests.
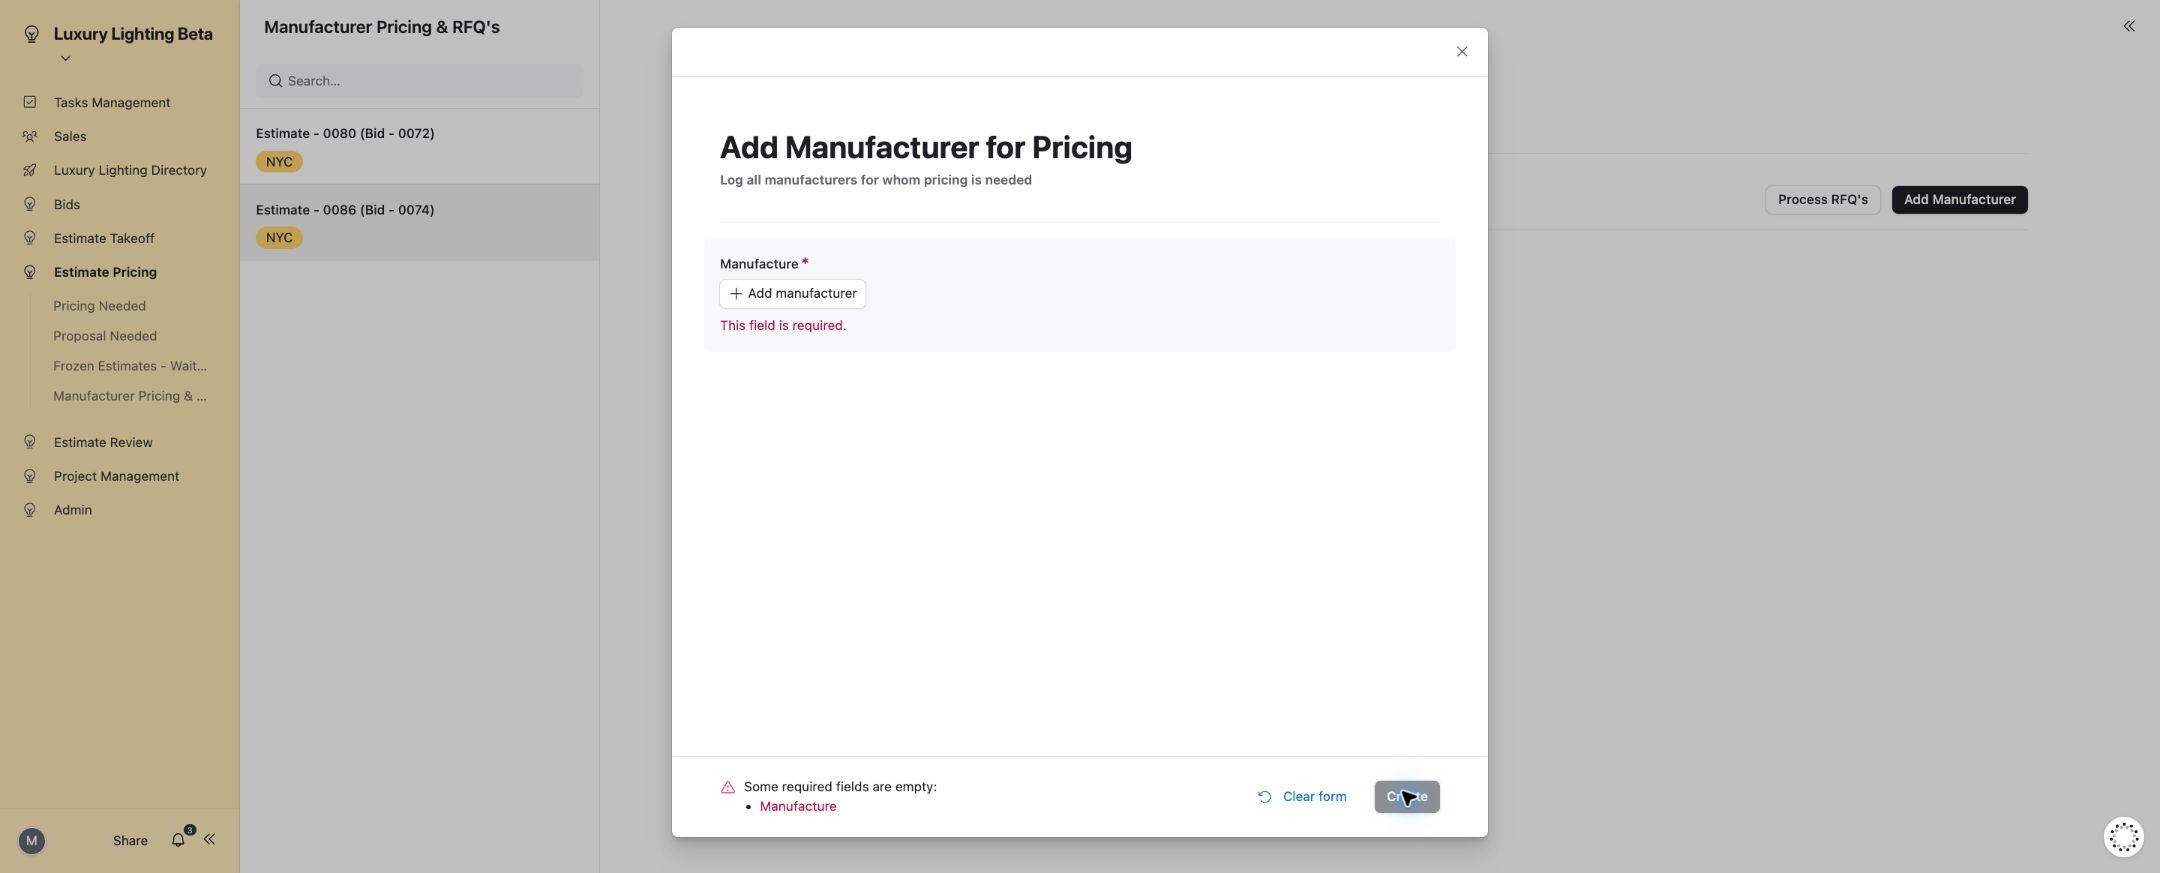
- Select Add Manufacturer, choose Manufacture and select Representative when available. Leave Representative empty for an appropriate direct manufacturer.
- Create the line and verify it appears in Manufacturer Pricing & RFQ List for the correct estimate. Repeat for each manufacturer needing pricing.
- Check whether each line uses In House Price Sheet or RFQ, and review Pricing Status and Email For RFQ.
- Obtain pricing from the relevant sheet/representative/direct manufacturer, prepare the pricing in MMS and save the working/final files in the Estimate Folder.
- Complete the Pricing stage only when its work and files are ready for review.
Manufacturer pricing is broader than RFQs. The system determines RFQ grouping from manufacturer/representative relationships, price-sheet availability and configured grouping settings. Check the actual line values before processing.
Field checklist: Add Manufacturer for Pricing
| Field | Requirement | What to enter |
|---|---|---|
| Manufacture | Required | Enter or select the correct value for this record. |
| Representative | Optional; shown only in the relevant branch | Select representative - If no representatives are available, leave empty |
15. Send an RFQ and track the reply
Before sending: verify the estimate heading, manufacturer/representative, recipient email, due date and all required drawings/takeoff files. The Process RFQ’s button sends real emails.
- Open the correct estimate in Manufacturer Pricing & RFQ’s.
- Review all pending manufacturer lines. Correct missing or incorrect recipient data through authorized directory/admin maintenance before processing.
- Open Blueprints and Takeoff folders and verify the files. Files directly in those folders are included; do not rely on files stored only in nested subfolders.
- Select Process RFQ’s once.
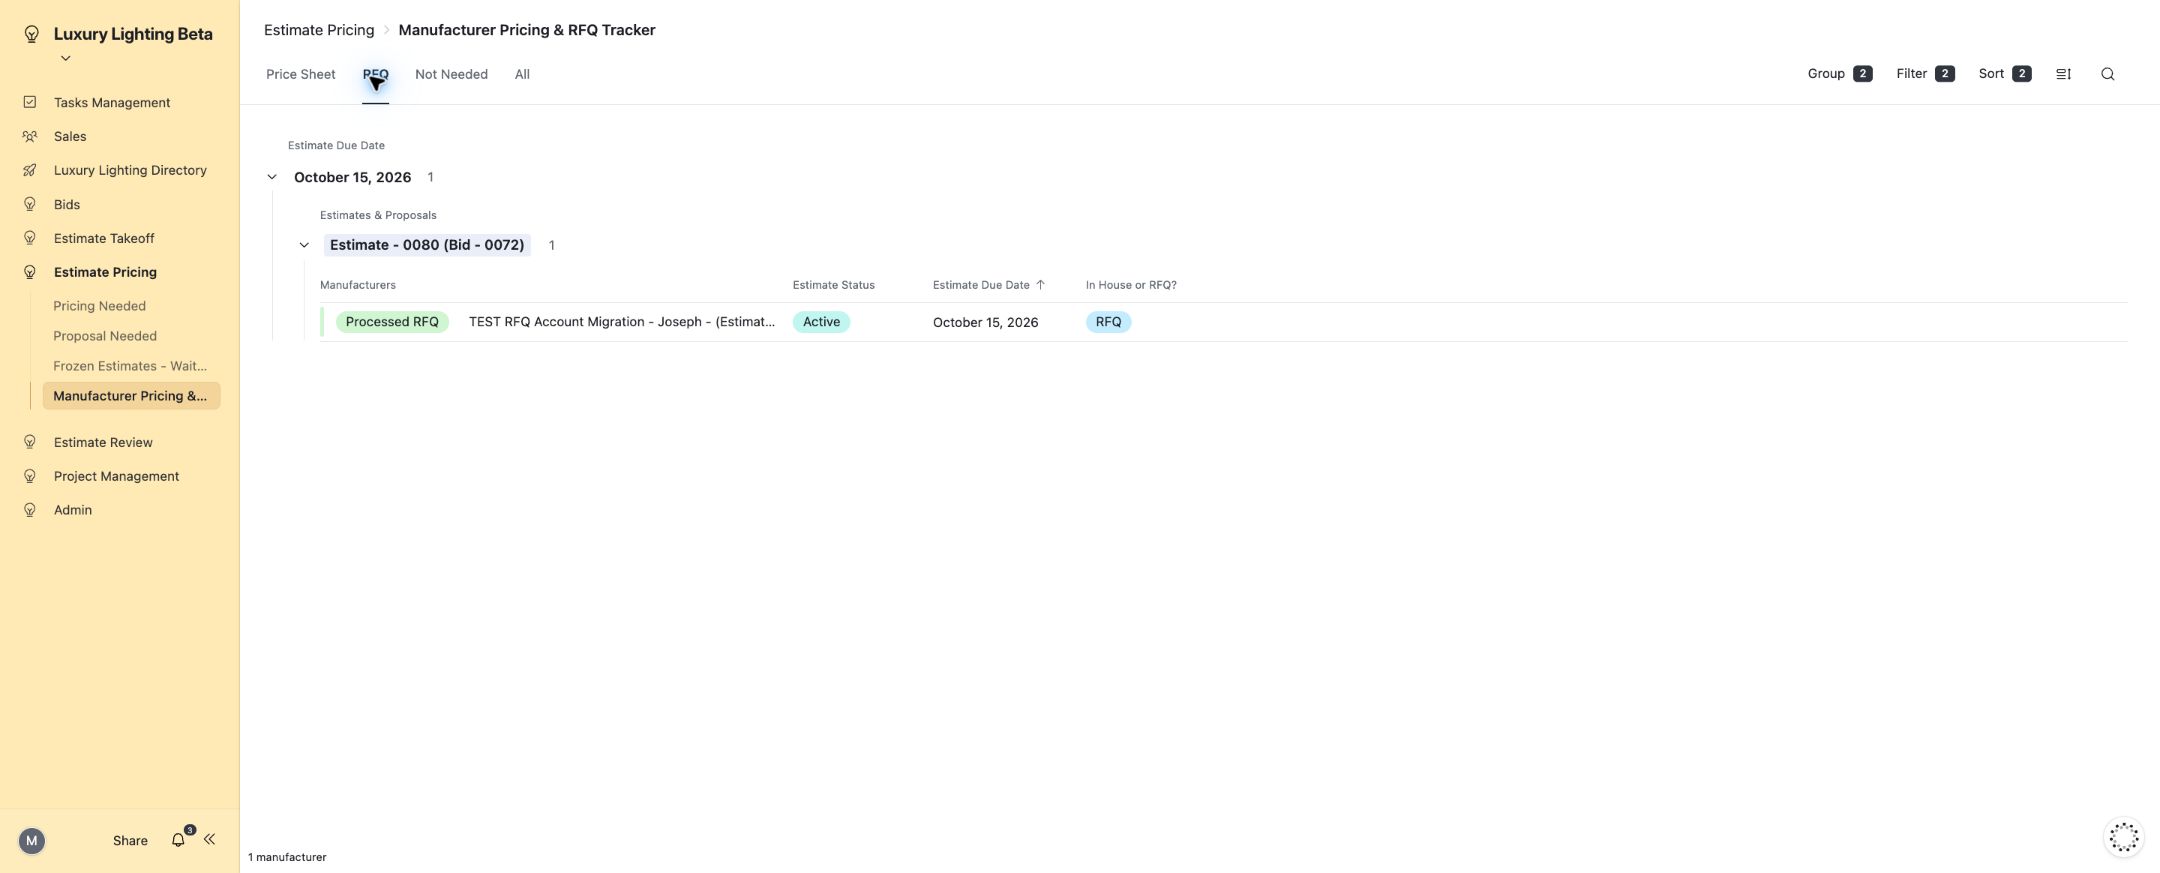
- Wait for processing, then inspect the manufacturer lines. A successful RFQ should have Pricing Status Processed RFQ, an RFQ ID, sent date, Outlook message ID and Email Thread link.
- Open Email Thread to review the sent email. Verify recipient, manufacturers, project, deadline and attachments.
- Use Manufacturer Pricing & RFQ Tracker to review Price Sheet, RFQ, Not Needed and All tabs. Open the manufacturer line to inspect status and correspondence.
- When pricing arrives, record the appropriate received/completed status where editable and keep the pricing files with the estimate. Check that the line leaves the outstanding work view.
Automatic behavior: Airtable groups the lines, assigns RFQ references and prepares the messages. Make retrieves files from SharePoint, attaches them to one draft, sends from the RFQ mailbox and writes the sent-email result back. A missing recipient can generate an internal not-sent notice instead of an RFQ.
Follow-up: configured due dates and tasks can support follow-up. Do not assume a future follow-up task exists until you can see it in your task queue. Received/completed pricing should stop further outstanding-request follow-up according to the configured rules.
Completion check: the sent result is recorded, the Email Thread opens the sent message and the attachments are readable. An RFQ ID alone does not prove the email was sent.
Follow up after sending
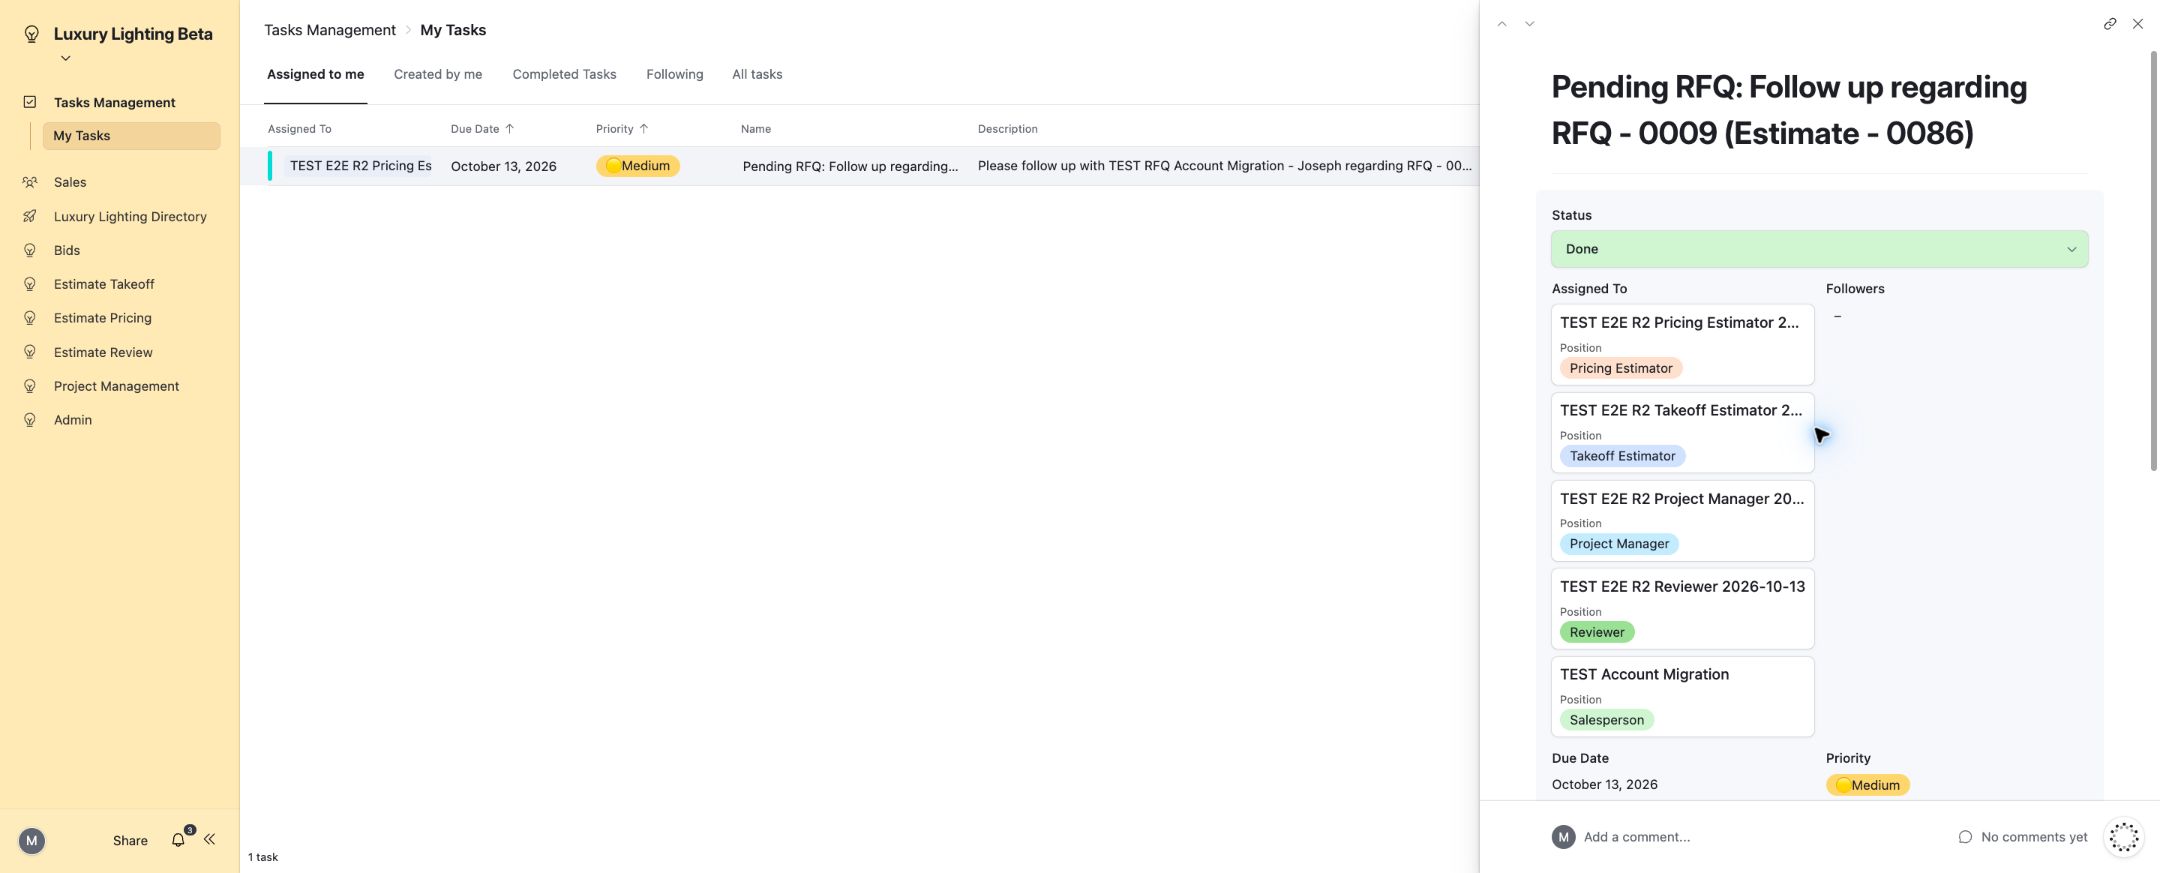
- Use RFQ Tracker to set a Manual Follow-up Date when a specific follow-up is needed.
- Pending settings/template links are attached by the daily 11:30 PM New York automation. Due tasks are generated at 4 AM New York, using the configured per-manufacturer grouping.
- Open the linked task in My Tasks, record the actual work and set Status to Done. An existing open task prevents another from becoming due.
- Completion records the follow-up date; the next date follows the interval/calendar rules. Use Received RFQ and then Mark Complete when pricing arrives/is finished; those states stop RFQ follow-up eligibility.
Task actions and completion passed on RFQ 0009. Automatic email reply ingestion was not tested; the verified receipt controls were manual. Ensure each owner User maps to one employee record.
16. Prepare and send a proposal
Pricing estimators use Estimate Pricing → Proposal Needed. Project managers use Project Management → Proposal Needed for PM-owned work, including VE. Both pages provide the same proposal preparation and sending handoff for their assigned role.
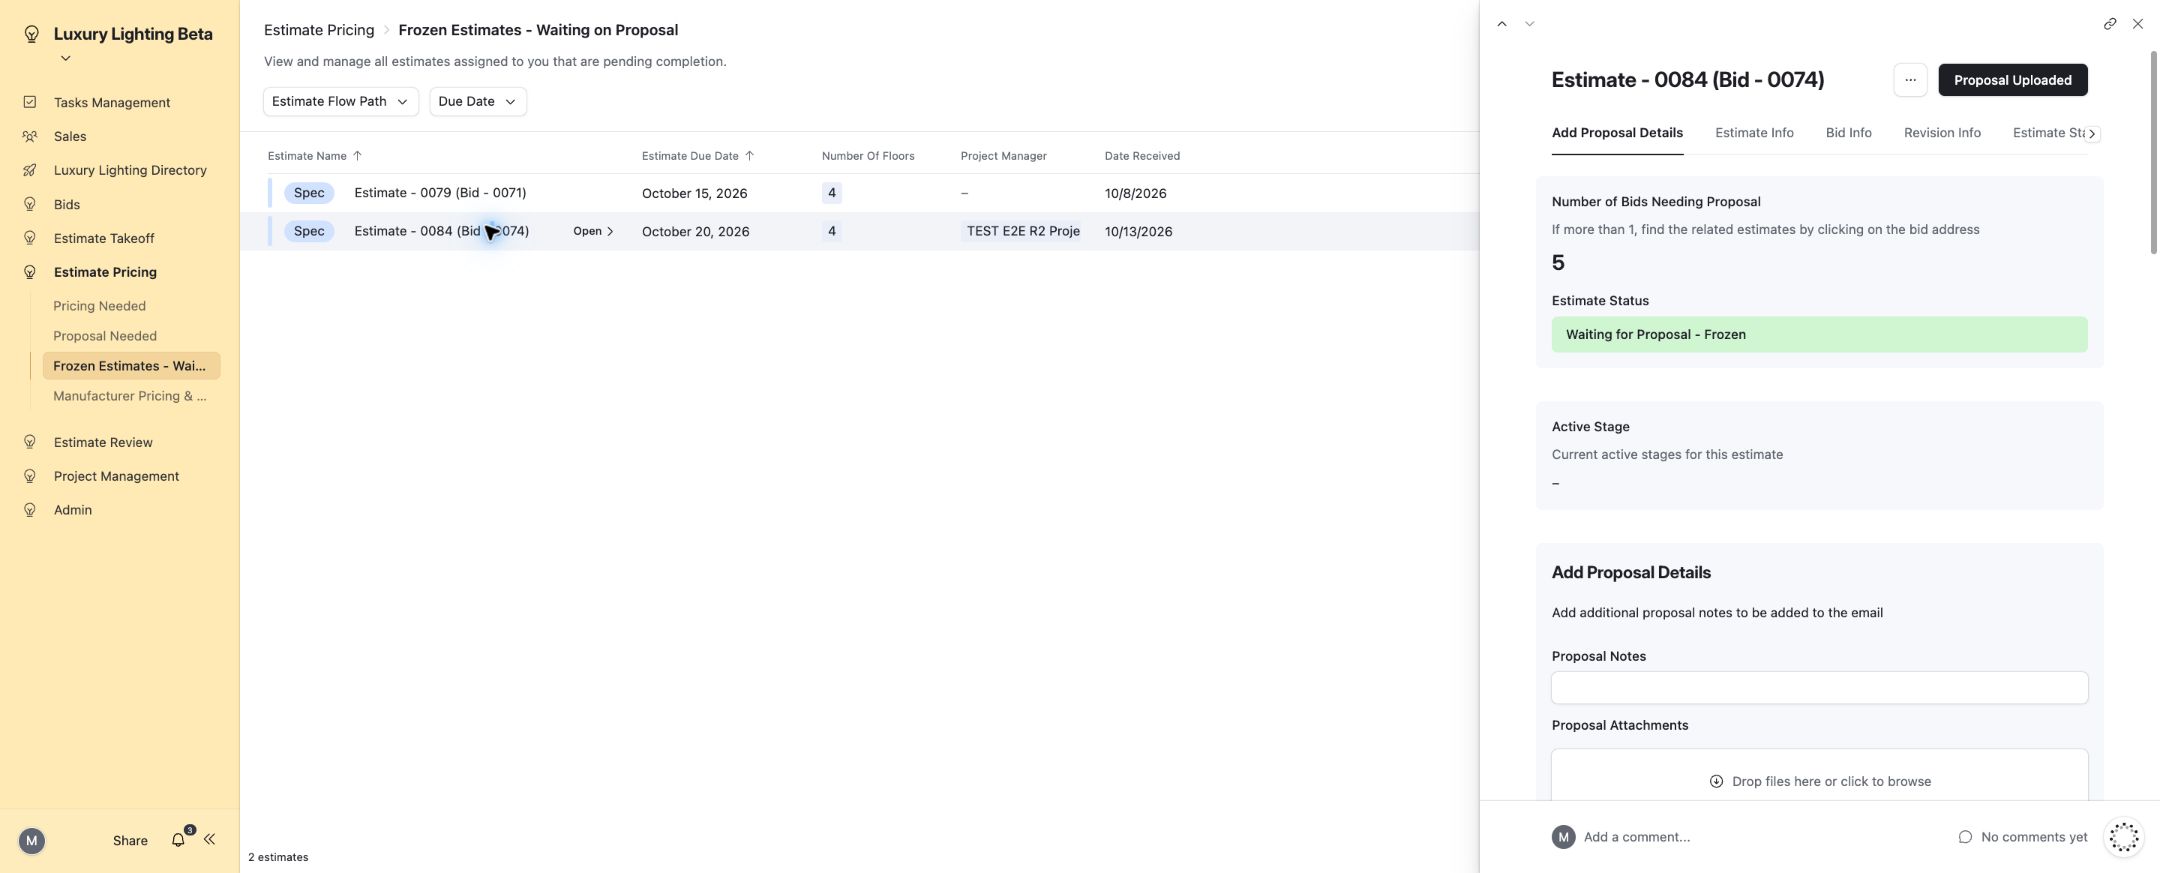
After pricing review, open Estimate Pricing → Proposal Needed. If the bid uses the frozen workflow, open Frozen Estimates – Waiting on Proposal instead.
- Open the correct estimate and review Estimate Info, Bid Info, Revision Info and assigned team.
- Finalize the proposal in MMS. Save the proposal directly in this estimate’s Estimates folder.
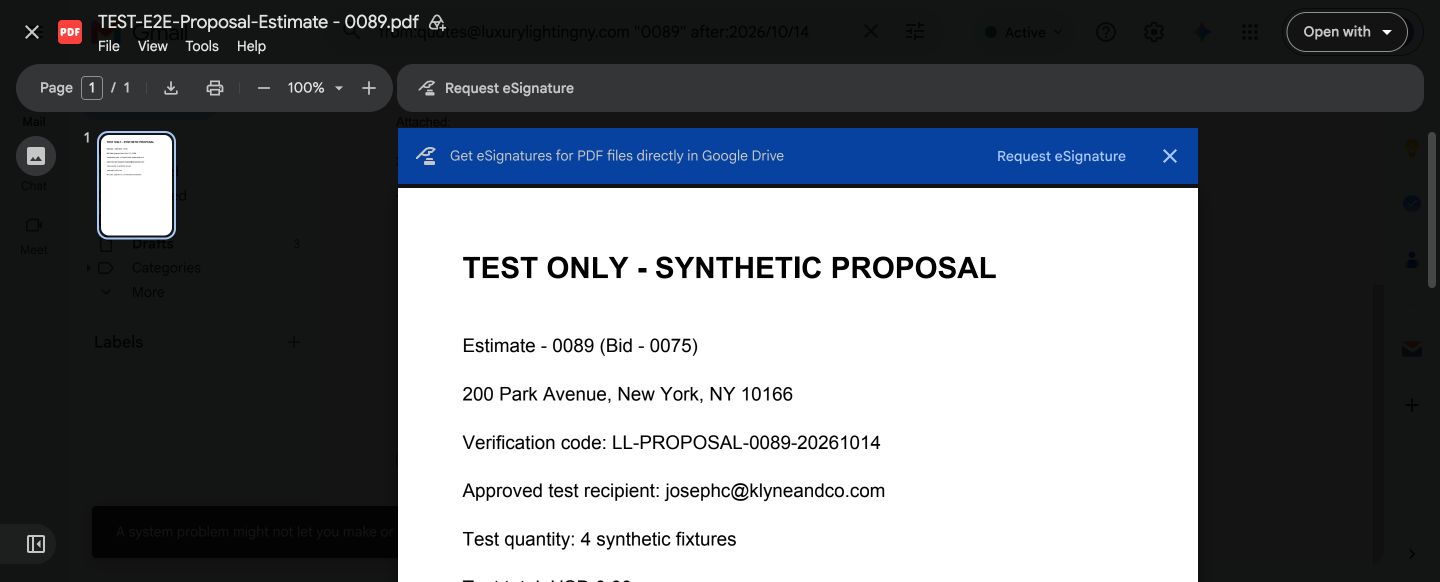
- Ensure the proposal filename contains the exact Estimate Identifier displayed by the record. For example, the identifier Estimate - 0086 needs a filename containing that complete text, such as TEST-E2E-Proposal-Estimate - 0086.pdf. A filename containing only 0086 can fail the matching rule. Use the actual identifier; do not assume the bid number is the estimate number.
- Keep one clearly identified final matching proposal in the folder. Make currently selects the first matching file.
- In Add Proposal Details, enter Proposal Notes for exclusions or other notes to include in the client email. Add optional Proposal Attachments when needed.
- Verify the primary contact’s email, salesman’s email and pricing estimator’s email. Verify the final proposal opens correctly.
- Use Proposal Uploaded only when ready to send, then confirm Yes, continue. This triggers the outbound email flow.
- Check the result: successful sending marks Proposal Sent and resets Proposal Uploaded. Review the sent proposal in Sales and confirm the intended file reached the client.
Automatic behavior: Airtable fills the client and not-sent templates. Make looks for a filename containing the estimate ID in the supplied folder. When found, it attaches that proposal plus optional attachments, sends from the Quotes connection with the salesman as reply-to and updates Airtable.
If no matching file is found: Make sends an internal notice to the assigned pricing estimator and resets Proposal Uploaded. The client proposal is not sent. Fix the folder/file/filename, then deliberately retry. A cleared Proposal Uploaded flag by itself does not prove successful sending; verify Proposal Sent.
The internal notice is a failure branch, not a routine copy of every successful client proposal. A frozen estimate can reach this proposal flow without the normal five-stage sequence.
Check delivery and follow up
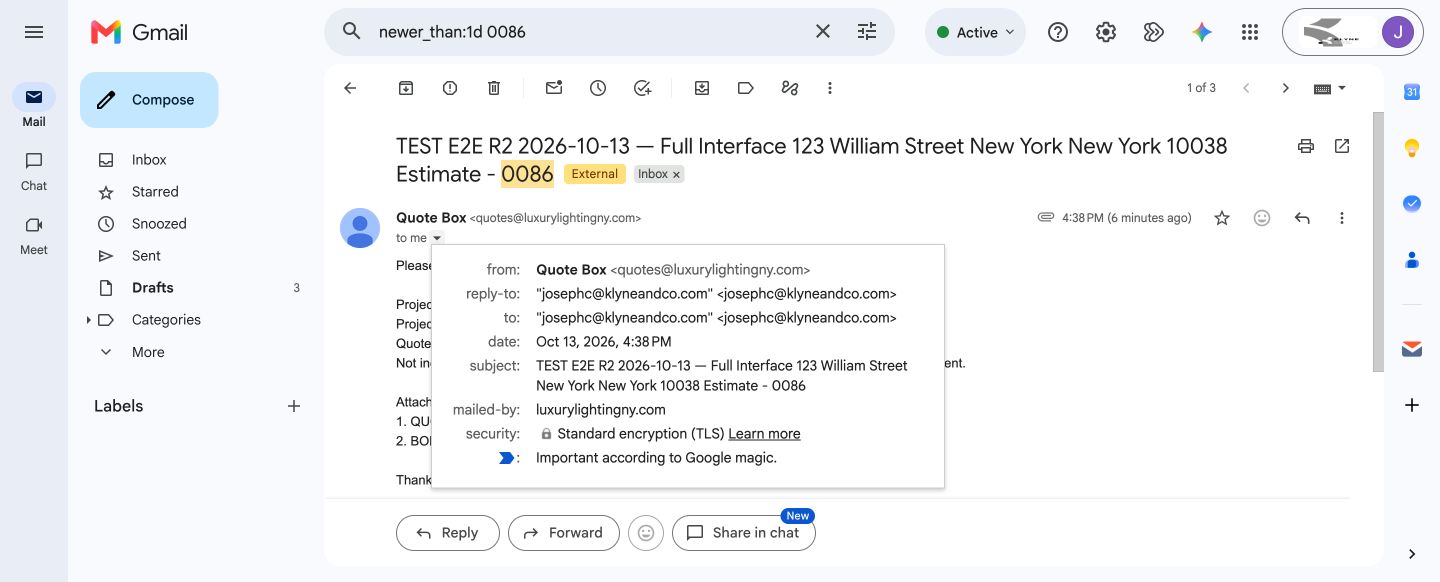
The verified send came from quotes@luxurylightingny.com, with the salesman as reply-to. Open the received main proposal and optional files to confirm they are readable. A successful client send does not generate a routine internal copy; the internal message tested was the missing-proposal notice.
Settings/template links are attached at 11:30 PM New York; due proposal tasks are generated at 4 AM. Complete the linked task in My Tasks. The system clears a used manual date, records completion and calculates the next date using its interval and excluded-day rules. In the isolated October 13 test the next date was October 22.
Queue handoff: keep the proposal detail open while completing Proposal Creation, uploading the file and using Proposal Uploaded. In the test, marking the stage Done removed the estimate from Proposal Needed even though its status was Proposal Ready to Send. Its existing record detail link still allowed sending. If you closed it and cannot find the send control, provide the estimate ID to the owner; do not create a duplicate estimate or use Won/Lost to simulate sending.
Delivery delay: successful Make completion and Proposal Sent are useful checks, but also verify the actual recipient/file. The test mailbox briefly delayed/indexed the frozen proposal while scanning its PDF; refreshing later showed successful delivery.
17. Submit a new revision
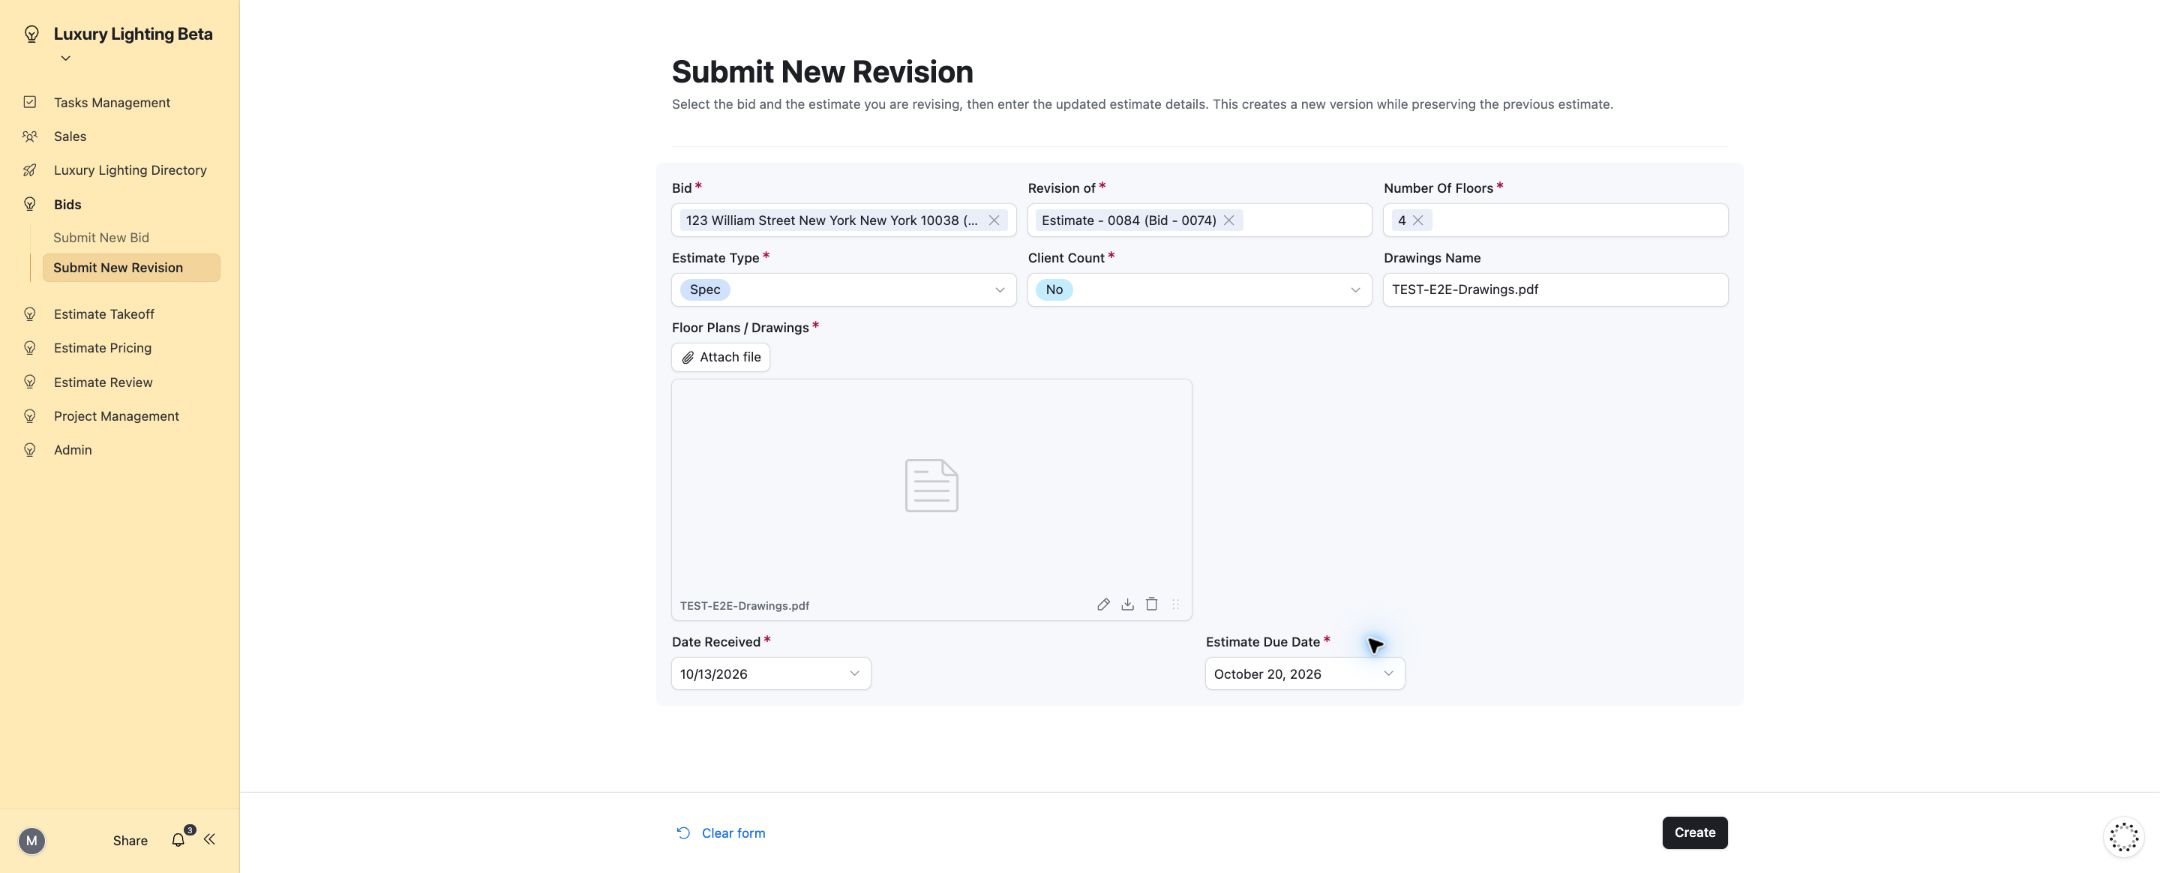
- Open Bids → Submit New Revision.
- Select the existing Bid and the exact estimate being revised in Revision of.
- Select Number Of Floors, Estimate Type and Client Count.
- Upload the revised Floor Plans / Drawings and optionally provide Drawings Name.
- Enter Date Received and Estimate Due Date, then submit.
- Open the bid, locate the new estimate and review Revision Info on both the old and new records.
- Confirm the predecessor/successor links, displayed version and workflow routing before sending an RFQ or proposal for the revision.
Completion check: a separate new estimate exists under the correct bid, with revised documents and dates. Preserve the previous estimate as history. Do not assume the displayed version number is correct without checking Revision Info; the test originally found missing parent-history links on 0085; its test data was repaired to V2. Have the administrator check predecessor/history links if the version is inconsistent. No additional revision automation remains enabled from this test.
Field checklist: Submit New Revision
| Field | Requirement | What to enter |
|---|---|---|
| Bid | Required | Enter or select the correct value for this record. |
| Revision of | Required | Enter or select the correct value for this record. |
| Number Of Floors | Required | Enter or select the correct value for this record. |
| Estimate Type | Required | Choices: Spec, VE, Quick Quote. |
| Client Count | Required | Choices: Yes, No. |
| Drawings Name | Optional | Enter or select the correct value for this record. |
| Floor Plans / Drawings | Required | Enter or select the correct value for this record. |
| Date Received | Required | Enter or select the correct value for this record. |
| Estimate Due Date | Required | Enter or select the correct value for this record. |
Revision numbering now verified on creation: the existing Estimate Revision Linking automation uses When a record matches conditions → Revision of is not empty. After you submit the revision form, it automatically copies the immediate predecessor and its ancestors into Linked Parent Revisions. The version counts these ancestors plus one. Fresh0093, revising0092V2, automatically becameV3 with0092 and0089 in its history. No manual link reselection is part of the normal creation procedure. Fix and test evidence.
Existing records or later predecessor corrections: the trigger runs when a record newly meets its condition. It does not bulk-backfill existing matches, and changing a filled predecessor directly to another filled predecessor does not re-enter the matching set. Ask the authorized owner to review the history for a correction to an existing revision. Do not change old records solely to force an automation run.
18. Follow proposals through the sales pipeline
- Open Sales → Sent Proposals and check the actual Estimate Status and Date Proposal Sent. The test also showed a Proposal Ready to Send record in this list, so the page title alone is not proof of sending.
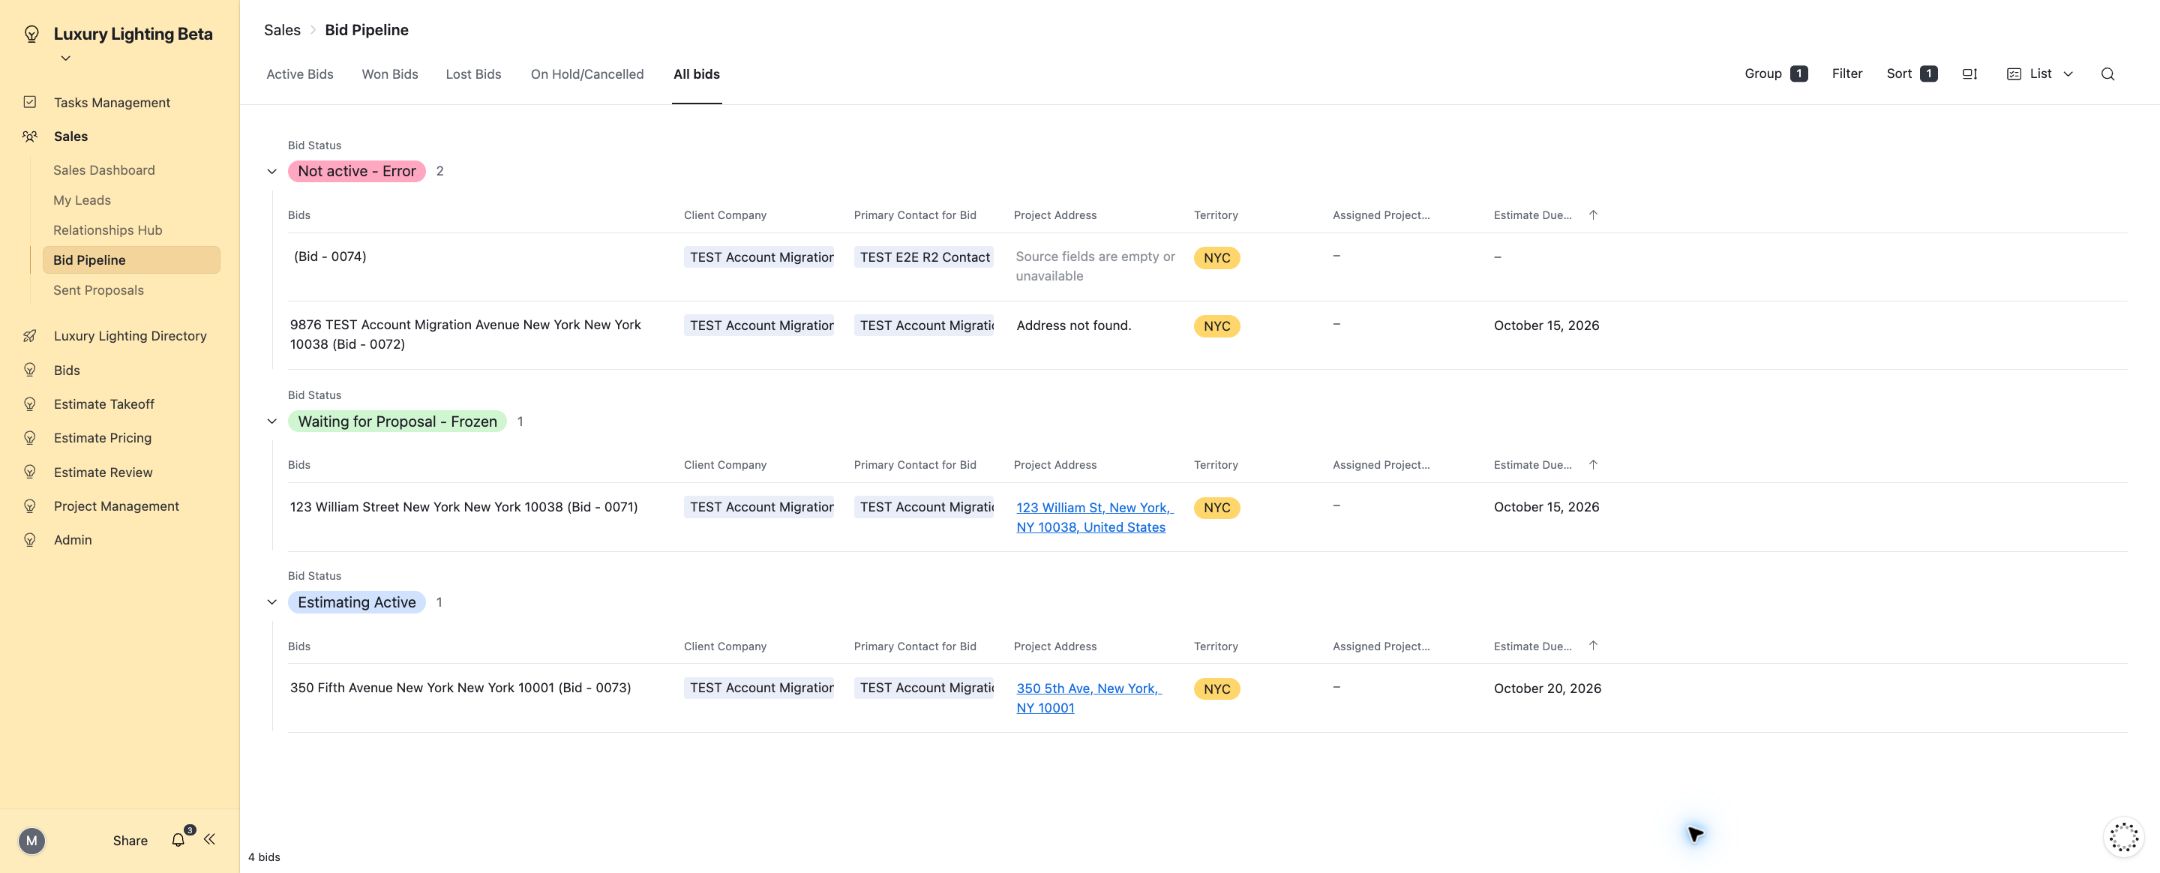
- Use Bid Pipeline to review Active Bids, Won Bids, Lost Bids, On Hold/Cancelled and All bids.
- Use the bid detail’s Estimates section to select the relevant estimate/version.
- When an award decision is confirmed, open the estimate in Sent Proposals, click Mark Won/Lost or Update Due Date, select Won 🔥 or Lost 😔, enter the required Lost Reason for Lost, then click Update. Verify the estimate status. This form can also update its due date.
- Refresh the pipeline and confirm the outcome is reflected correctly. Review any related project record with the project manager after a win.
- Use Sales Dashboard to review Lead Activity, My Bids, My Leads and Tasks Management; open the underlying list for individual records.
Estimate Status and Bid Status are calculated fields. Do not try to type directly into these labels. Use the underlying workflow/outcome controls available to your role.
Hold/cancel: these status flags exist in the base and their formulas were tested on a dedicated fixture, but the published bid detail has no action to set them. Ask the authorized owner for the established administrative route. Project conversion: no conversion action or automatic project creation was found in the current published workflow; a Won outcome alone did not create a project link. Do not expect this as an implemented next step.
Completion check: confirm the estimate outcome, the parent bid’s calculated status and the Sales Dashboard together. The isolated test verified Won and Lost counter changes and required a Lost Reason. Do not overwrite a real award decision merely to check the dashboard.
19. Project management and daily routine
Use Project Management → Lead Activity for the activity view exposed to that role. Use company and bid details to inspect the company PM, customer contacts, estimates and assigned team.
- Review your tasks and overdue items at the start of the day.
- Review lead touchpoints in Relationships Hub and complete/log actual activity.
- Check active bids for correct customer data, deadlines and ownership.
- For estimating work, open your active stage queue and check SharePoint files before marking a stage done.
- For pricing, check outstanding RFQs and record received prices before completing the work.
- For proposals, verify Proposal Sent rather than relying on the upload button or a cleared checkbox.
- Use record comments for context and handoffs. Record an explicit owner and next action in the relevant task when follow-up is needed.
Complete PM-owned pricing, including VE
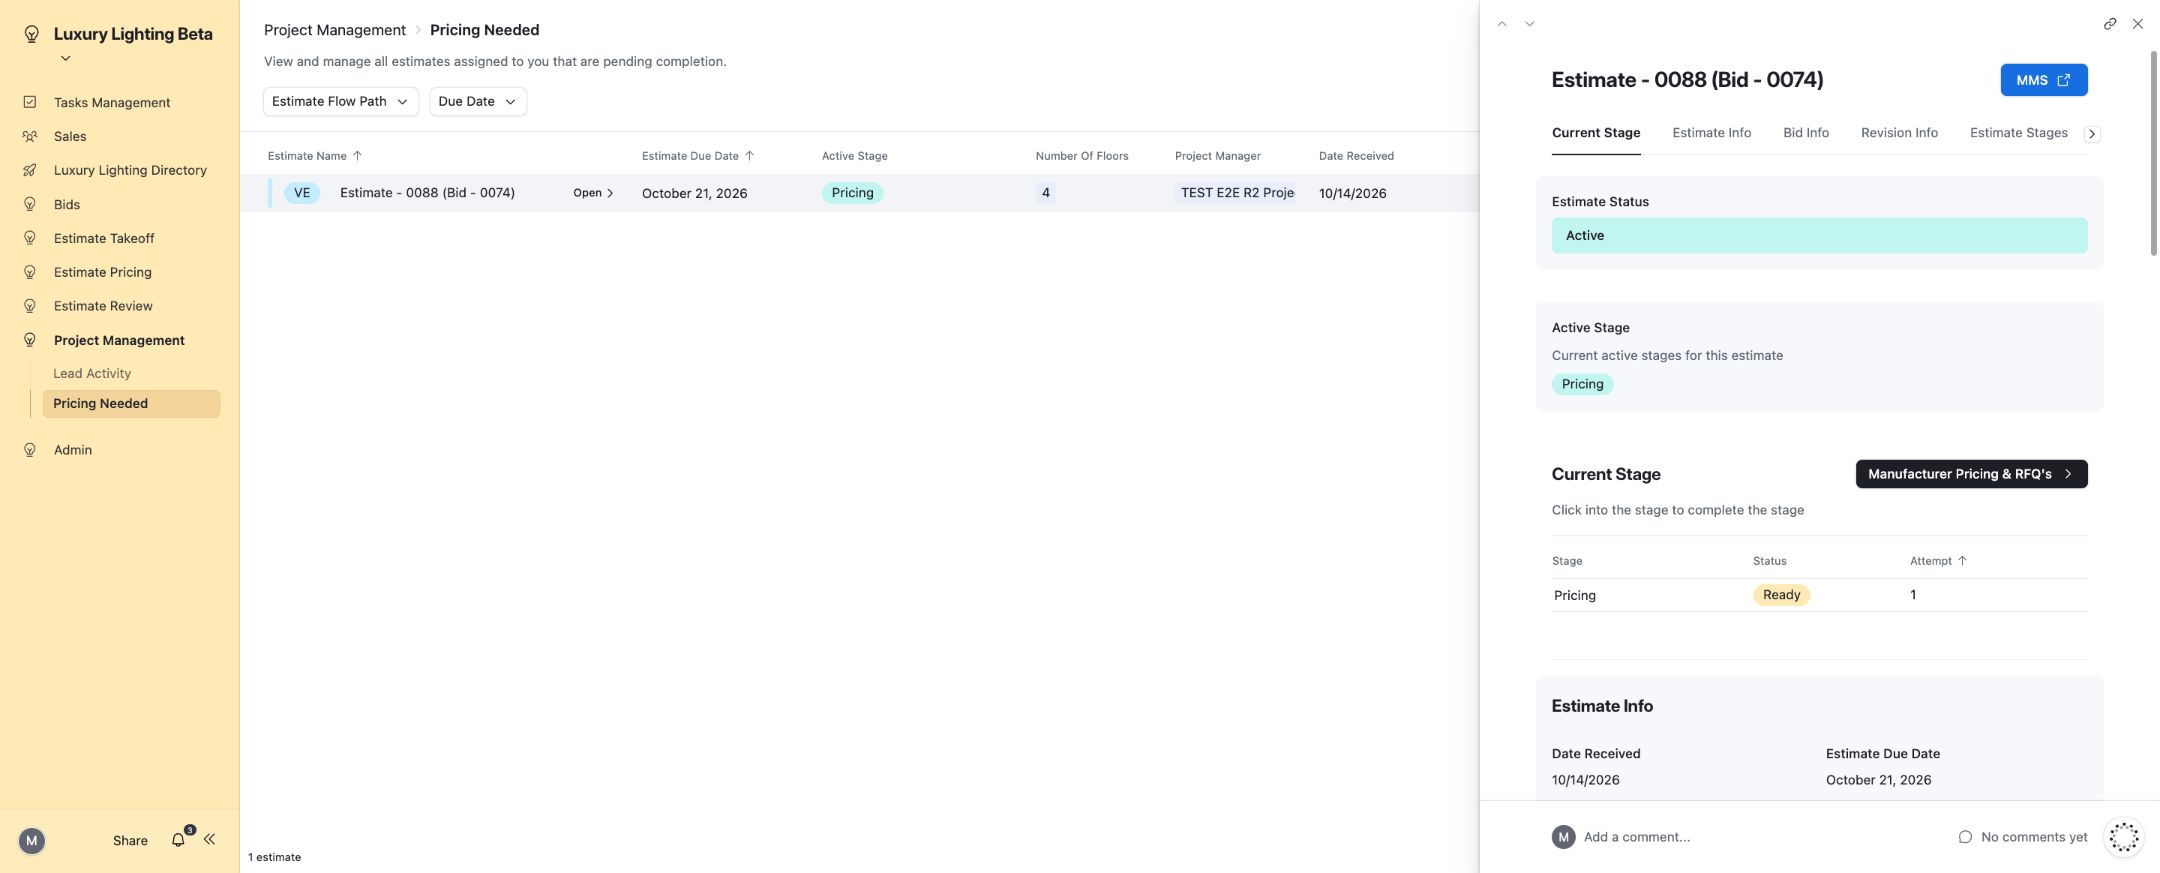
- Open Project Management → Pricing Needed.
- Select the estimate assigned to you. Check the bid, version, due date and SharePoint folders.
- Open the Pricing row under Current Stage and select In Progress when starting.
- Complete the pricing work in MMS, obtain manufacturer prices/RFQs as needed, and save the final pricing file in the Estimate Folder.
- Reopen the Pricing stage and select Done only after the work is complete. The estimate leaves this pricing queue when the next stage becomes active.
PM-owned Pricing stages for your assigned bids appear here, excluding superseded/error estimates. For VE, Proposal Creation becomes Ready after Pricing is Done. Continue in Project Management → Proposal Needed.
Prepare a PM-owned proposal
- Open Project Management → Proposal Needed and select your estimate.
- Check the bid, version, due date, pricing file and related bids. Prepare the final proposal in MMS and save the correctly named PDF in the estimate’s SharePoint Estimates folder.
- Add proposal notes and optional attachments where needed.
- Open Proposal Creation under Current Stage, select In Progress, then Done when the proposal is complete.
- Keep the estimate detail open. Check Proposal Ready to Send, select Proposal Uploaded, review the confirmation and confirm sending when the file and recipients are correct.
- Verify Proposal Sent and actual delivery; clicking upload alone is not proof of delivery.
VE0088 verified the PM stage controls and the upload handoff. Sending uses the existing shared proposal automation, already verified on the Spec and frozen test routes. Completed stage work leaves this active queue; keep the detail open until sending is finished.
20. If something is missing or stuck
| What you see | What to do |
|---|---|
| Record missing from your queue | Clear temporary filters and check the selected tab, current stage, assigned employee and linked Airtable user. |
| Company missing from the contact picker | Selection requires company contacts with a salesperson linked to your current Airtable user. A company with no contacts is excluded. Use Create New Company within the contact form for new sales companies, or ask the administrator to establish the intended relationship. |
| Task employee picker has no results | Assigned By requires Company Email to contain the signed-in user’s email. Check the existing employee’s email and account identity; preserve the filter. |
| Address still processing | Wait and revisit the bid. If the error persists, provide the bid and address to the administrator. Avoid duplicate submission. |
| Blank folder links | Allow the next 15-minute Make folder run, then refresh. If still blank, report the estimate and creation time for execution-history review. |
| Empty Takeoff or Estimates folder | The assigned estimator must upload those files. The folder automation transfers drawings, not the estimating work itself. |
| RFQ page opens the wrong estimate | Select the correct estimate from the left record list before processing. The link formula was corrected and the button navigation passed its retest on October 13. Always check the estimate heading before processing. |
| RFQ reference exists but status is not Processed RFQ | Check the sent-result fields and email thread; ask the administrator to inspect the matching automation run before retrying. |
| Proposal not sent notice | Check the correct Estimates folder, matching estimate-ID filename and file readability. Re-trigger only after correcting the cause. |
| Review rejection confirmation disabled | Save meaningful notes, use the rejection action, and refresh to verify actual Status and the new attempt. The fresh rejection/rework test passed. If Status still does not change, report the control; do not use Done to represent rejection. |
| Dates or counts look wrong | Compare with the underlying activity record and dates. Report the record and visible discrepancy. |
When requesting help, include the page name, bid/estimate identifier, intended action, approximate time and a screenshot. Never include tokens or secret webhook URLs.
Current known issues and test coverage
- Activity date: owner accepted the current local-date display as is on October14. No repair is pending; stored dates were not changed.
- No activity yet: Days Since Last Contact now displays a dash. The earlier empty-date fix passed its retest.
- Revision version — creation fix passed: the existing automation now catches a newly populated Revision of condition. Fresh form-only0093 automatically becameV3 with both ancestors. Existing older matches were not backfilled; report an older version mismatch to the owner.
- Quick Quote: the corrected configuration passed a fresh five-stage test on0094. Allow initialization to finish and refresh before reporting an empty first stage. Report a persistent missing stage with the estimate ID.
- VE: use Project Management → Pricing Needed, then Proposal Needed. Both PM stage controls passed. Check your assigned PM user and the active stage if a queue is empty.
- Shared employee User: duplicate User mappings can assign follow-up tasks to multiple employee records. Resolve identity setup through the owner.
The requested Quick Quote and VE PM stage checks now passed. Activity-date display is accepted and scheduled follow-ups are owner-confirmed working. Both documents retain the exact test boundaries: shared outbound delivery passed earlier; it was not repeated separately on every variant, and commercial MMS calculations were outside this synthetic test.
21. Complete page directory
The inspected page inventory is listed here. Names are the live interface labels; hidden/test pages are not necessarily published user navigation. Google Maps Test is unpublished and excluded from the user workflow. Equivalent directory layouts may present the same underlying records differently.
| Interface | Page | Purpose |
|---|---|---|
| Tasks Management | All Tasks | Review open, completed and all general tasks; use Add task to create work. |
| Tasks Management | My Tasks | Review Assigned to me, Created by me, Following, Completed Tasks and All tasks. |
| Sales | Sent Proposals | Review estimates recorded as having proposals sent; open details for context and sales follow-up. |
| Sales | Relationships Hub | Log and schedule interactions; work through overdue, today and next-week activities. |
| Sales | Bid Pipeline | Review bid lists by lifecycle tab and open the linked estimates. |
| Sales | My Leads | Review your leads, warmth, company relationships, bids and pending activities. |
| Sales | Sales Dashboard | Review summaries for activity, bids, leads and tasks; follow links to work lists. |
| Luxury Lighting Directory | Employee Directory | Find employee business information, team, position, status and manager. |
| Luxury Lighting Directory | Contacts Directory | Browse contact records using the directory layout available to you. |
| Luxury Lighting Directory | Companies Directory Page | Search companies, create a company and open its information, contacts and bids. |
| Luxury Lighting Directory | Companies Directory | Browse company records using the alternate directory layout. |
| Luxury Lighting Directory | Contact Directory Page | Search/filter contacts, add a contact or lead and open related-company details. |
| Bids | Submit New Bid | Create a bid with address, customer, project, dates and drawing files. |
| Bids | Bids Google Maps Test | Unpublished test page; excluded from the user workflow. Use Submit New Bid. |
| Bids | Submit New Revision | Create a new estimate version linked to a bid and predecessor estimate. |
| Estimate Takeoff | Takeoff Needed | Work on assigned takeoff stages and upload the completed takeoff file. |
| Estimate Pricing | Proposal Needed | Prepare the proposal and use Proposal Uploaded when ready for outbound sending. |
| Estimate Pricing | Manufacturer Pricing & RFQ's | Select the correct estimate, add manufacturers and process RFQ emails. |
| Estimate Pricing | Frozen Estimates - Waiting on Proposal | Handle the proposal route for frozen estimates without normal estimating stages. |
| Estimate Pricing | Pricing Needed | Work on pricing, manufacturer requests and the pricing-stage handoff. |
| Estimate Pricing | Manufacturer Pricing & RFQ Tracker | Review manufacturer lines under Price Sheet, RFQ, Not Needed and All. |
| Estimate Review | Pricing Review Needed | Review pricing work and approve or initiate correction through the stage controls. |
| Estimate Review | Takeoff Review Needed | Review takeoff work and approve or initiate correction through the stage controls. |
| Project Management | Lead Activity | Review lead activity in the Project Management interface. |
| Admin | Add New Employee | Administrator form for employee contact details, position, team and user mapping. |
| Project Management | Pricing Needed | Complete PM-owned Pricing stages for assigned bids, including VE. Completed work leaves the queue. |
| Project Management | Proposal Needed | Prepare PM-owned proposals, complete Proposal Creation and use Proposal Uploaded for the existing send handoff. |
Embedded forms: Create New Task; Add New Lead/Contact; Schedule Activity Task; Log Activity; Add New Company; Add Manufacturer for Pricing. Open these through their parent-page buttons rather than treating them as separate navigation pages.